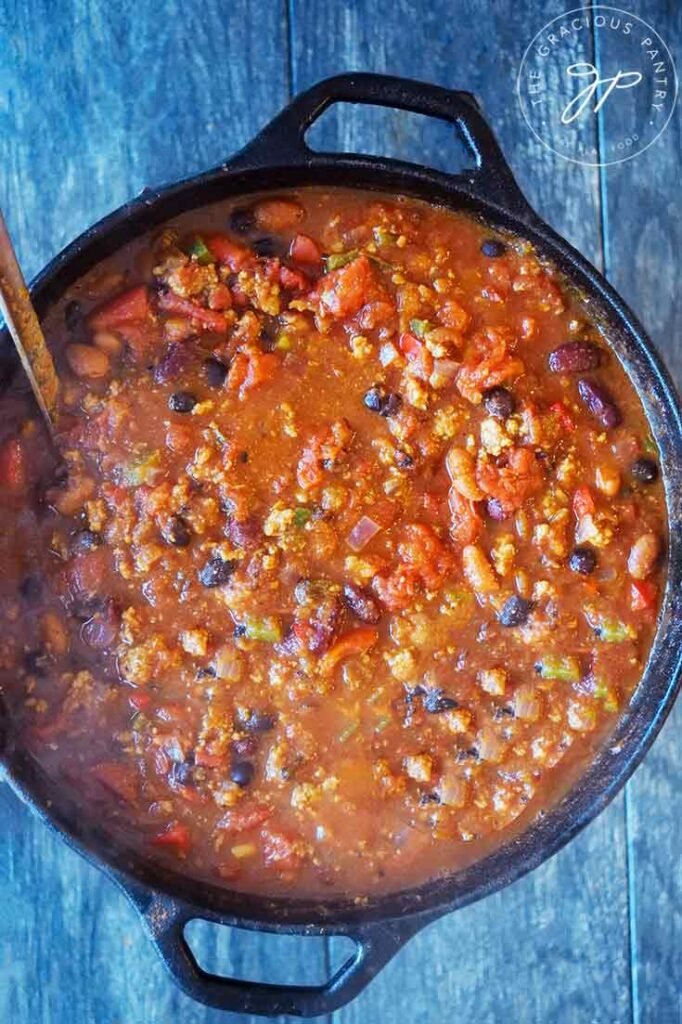
Dutch Oven Chili with Beans

A hearty, slow-simmered Dutch oven chili with beans — comforting, easy to scale, and ideal for weeknights or game-day crowds. This recipe highlights deep, developed flavors from browning, deglazing, and a long gentle simmer in your favorite Dutch oven.

20 min Prep Time
90 min Cook Time
110 min Total Time
6 Servings
Easy Difficulty

Ingredients

Servings:
6
Nutrition (per serving)
Calories 480 kcal
Protein 28g
Fat 18g
Carbohydrates 46g
Fiber 12g
💾 Storage

Refrigerate cooled chili in an airtight container for up to 4 days. For longer storage, freeze in portioned airtight containers or freezer bags for up to 3 months. Thaw overnight in the refrigerator and reheat gently on the stovetop over low heat, adding a splash of stock or water if needed; you can also reheat single servings in the microwave until warmed through.

🍳

Best Made With: Dutch Oven

Choose a 5.5–7.5 quart enameled cast-iron Dutch oven for even heat distribution and easy cleanup.

See Our Top Dutch Oven Picks →

Dutch Oven Chili with Beans

This Dutch oven chili with beans is all about depth: browned meat, toasted spices, and a long, gentle simmer that lets tomatoes, stock, and beans meld into a rich, comforting bowl. The heavy walls and tight-fitting lid of a good Dutch oven create even heat distribution and moisture retention, which transforms simple ingredients into a casseroled stew with complex flavor.

What makes this recipe special is its balance between robust flavor and home-cook simplicity. You’ll toast spices, brown the meat, deglaze the pot for the fond, and then let the chili slowly develop. It’s forgiving — easy to tweak for heat, texture, or protein — and it scales beautifully for friends and family.

Why a Dutch Oven Works Best

A Dutch oven’s ability to maintain steady low heat and redistribute it evenly is ideal for braises and stews like chili. The thick base prevents hot spots while the heavy lid traps steam so beans and aromatics soften and mingle without drying out. If you’re shopping for cookware, a versatile enameled cast-iron Dutch oven is a smart investment for soups, stews, roasts, and breads.

If you want to explore cookware choices, our guide to Best Non-Toxic Cookware covers durable, PFAS-free options; and for a comparison between premium stainless technologies, check our HexClad vs All-Clad guide.

Choosing the Right Equipment

For this chili, the star tool is the Dutch oven. Look for a 5.5-7.5 quart size for 4–6 servings: big enough to brown meat and hold the finished chili without crowding. Enameled cast iron is low maintenance, doesn’t require seasoning, and offers excellent heat performance. For a budget-friendly option, seasoned cast iron from reputable makers works just as well if you don’t mind a little extra upkeep.

If you’re ready to buy, start by looking at reliable Dutch ovens on Amazon: Le Creuset Dutch Oven and budget-friendly options like Lodge Dutch Oven are popular picks. A sharp chef’s knife makes prep faster — consider searching for a quality chef’s knife here: Wusthof chef’s knife.

How this Recipe Works (Quick Overview)

You’ll start by toasting and blooming spices to release oils and fragrant notes, then brown the meat to build savory caramelized bits (fond). Deglazing the pot captures those flavors into the sauce. Canned tomatoes, beans, and stock simmer slowly so flavors deepen and the chili thickens. A short rest off heat lets the chili stabilize and taste even better the next day.

Tips and Variations

  • Make it smoky: Add 1–2 tablespoons of chipotle in adobo or 1–2 teaspoons smoked paprika.
  • Swap the meat: For leaner chili, use ground turkey or a mix of beef and pork; or omit meat for a vegetarian version — add an extra can of beans and a cup of diced mushrooms for texture.
  • Control the heat: Add diced jalapeño with the onions for early heat, or serve on the side with sliced fresh chilies and hot sauce.
  • Thicken without cornstarch: Mash a cup of beans against the pot to release starches instead of using a slurry — it adds body and fiber.

With the right Dutch oven and a few pantry staples, this chili becomes a one-pot favorite you’ll make again and again.

Ready to cook? Scroll down to the ingredient list and step-by-step instructions. If you want other cookware ideas while shopping, our Best Non-Toxic Cookware guide is a helpful resource for safe, durable cookware picks.

Happy simmering — and don’t forget to set aside a little extra for leftovers; chili improves overnight.


Instructions

1

Toast and sauté aromatics

Heat the Dutch oven over medium heat, add the olive oil, then sauté the onion (and bell pepper if using) until softened, about 5–7 minutes. Add the garlic and cook 30–60 seconds until fragrant.

💡 Pro tip: Sweat the onions slowly — they should turn translucent, not brown, for a sweeter base.
2

Brown the meat

Increase heat to medium-high, add the ground meat, and break it up with a spoon. Brown thoroughly until most of the moisture has cooked off and the meat begins to caramelize, about 6–8 minutes.

💡 Pro tip: Don’t crowd the pot — brown in batches if needed to get good color and fond.
3

Bloom the spices and add tomato paste

Push the meat to the side, add the chili powder, cumin, smoked paprika, oregano, and chipotle/cayenne to the empty space and toast briefly (30–45 seconds). Stir in the tomato paste and cook 1–2 minutes until it darkens slightly.

💡 Pro tip: Blooming spices in fat unlocks deeper flavor than adding them directly to the liquid.
4

Deglaze and combine liquids

Pour in a splash of stock (or water) and scrape up the browned bits from the bottom of the pot. Add crushed tomatoes, diced tomatoes, remaining stock, and brown sugar if using. Stir to combine.

💡 Pro tip: Use the deglazing step to capture all the fond — it’s flavor gold for the chili.
5

Simmer low and slow

Bring the chili to a gentle simmer, then reduce heat to low and cover partially with the lid. Let simmer gently for 45–60 minutes, stirring occasionally, until flavors meld and chili thickens.

💡 Pro tip: If the chili becomes too thick, add a little more stock; if too thin, simmer uncovered for the last 10–15 minutes.
6

Add beans and finish seasoning

Stir in the drained beans and simmer uncovered for another 10–15 minutes to heat the beans through and let the sauce thicken. Taste and adjust salt, pepper, and spice level.

💡 Pro tip: Mashing a cup of beans against the side of the pot will thicken the chili naturally.
7

Rest and serve

Remove from heat and let the chili rest 10–15 minutes with the lid slightly ajar to let flavors settle. Serve topped with cilantro, shredded cheese, sour cream, or chopped onions as desired.

💡 Pro tip: Chili tastes even better the next day — refrigerate overnight if possible before serving to deepen flavors.

More to Cook

You Might Also Like

Cast Iron Shakshuka with Feta

A rustic, one-pan shakshuka made in a cast iron skillet—poached eggs in a spiced tomato sauce finished with tangy feta and fresh herbs. Easy to make, visually impressive, and perfect for brunch or a cozy weeknight dinner.

View Recipe →

Julienne Carrots for Stir Fry

Learn to julienne carrots precisely and quickly for stir fries, salads, and garnishes. This guide teaches the prep technique, the right tools (including choosing a chef's knife), step-by-step cutting instructions, tips, and storage.

View Recipe →

Stay in the loop

Get the Best Kitchen Picks Delivered

New buying guides, honest reviews, and kitchen-tested recipes — straight to your inbox. No spam, ever.