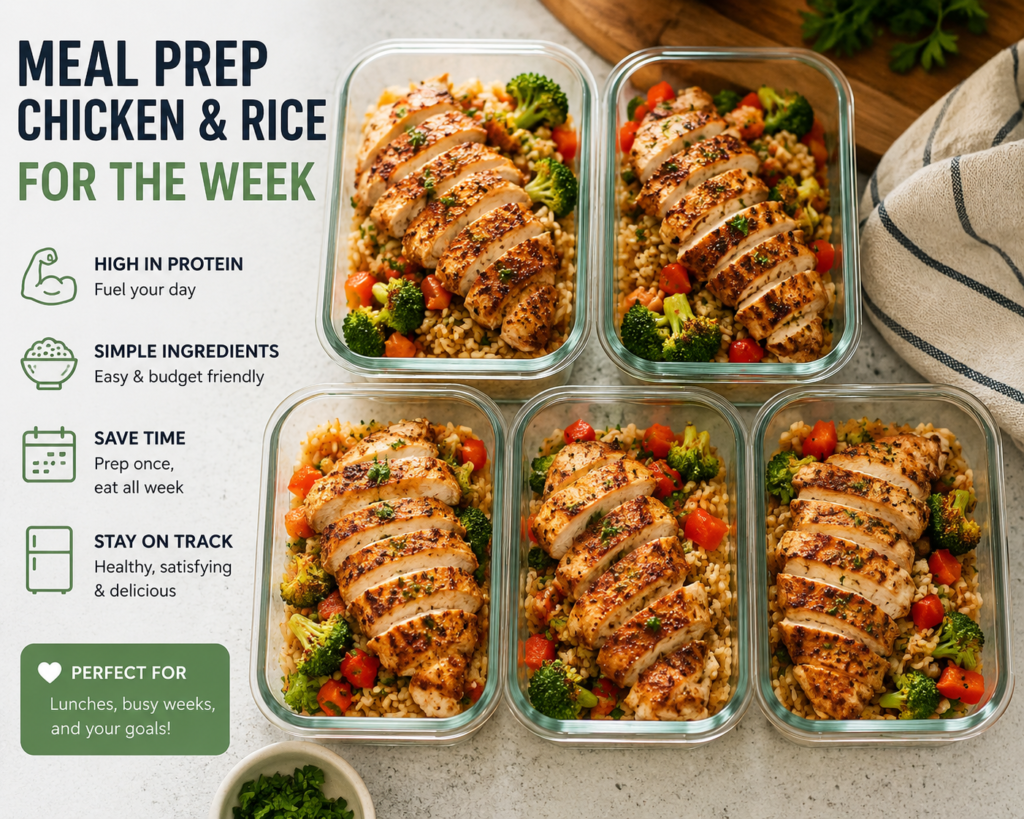
Meal Prep Chicken and Rice for the Week

Make weekday lunches easy with this simple, flavorful Meal Prep Chicken and Rice recipe—built for batch cooking and packed into ready-to-go containers. Learn equipment tips, storage advice, and variations to keep your meals fresh and delicious all week.

20 min Prep Time
35 min Cook Time
55 min Total Time
6 Servings
Easy Difficulty

Ingredients

Servings:
6
Nutrition (per serving)
Calories 520 kcal
Protein 38g
Fat 12g
Carbohydrates 54g
Fiber 4g
💾 Storage

Cool meals to near room temperature (no more than 1 hour) before sealing containers. Refrigerate in airtight containers for up to 4 days. For longer storage, use freezer-safe containers and freeze for up to 2–3 months; thaw overnight in the refrigerator before reheating. When reheating from frozen, thaw first or reheat gently on the stovetop with a splash of broth to restore moisture.

🍳

Best Made With: Food Storage Containers

Choose airtight, microwave-safe containers with good seals and compatible lids to keep rice fluffy and prevent leaks.

See Our Top Food Storage Containers Picks →

Meal Prep Chicken and Rice for the Week

This chicken and rice meal prep is a weeknight lifesaver: simple, balanced, and built to hold up in the fridge so you can grab healthy lunches or dinners in seconds. The recipe focuses on lean protein, hearty rice, and roasted or sautéed vegetables, with a light seasoning profile that stays fresh over several days. It’s intentionally flexible—swap vegetables, change the sauce, or switch to brown rice without losing the core convenience.

What makes this meal special is that it balances flavor, nutrition, and durability. The chicken is cooked until juicy and seasoned to complement rice and vegetables without becoming overpowering, while the rice is cooked with a little extra broth or olive oil so it doesn’t dry out in storage. When portioned into high-quality food storage containers, these meals keep well and reheat cleanly—no sogginess, no fridge funk.

Choosing the right equipment

Good tools make batch cooking faster and keep the finished meals tasting better longer. For this recipe you’ll want a good, heavy-bottomed skillet or sheet pan for roasting, an accurate measuring cup for rice, and high-quality food storage containers to portion and preserve your meals. Glass or BPA-free airtight containers are ideal because they don’t stain, resist odors, and go from fridge to microwave (or oven) safely.

If you’re shopping, consider glass or tempered-glass sets labeled for food storage; they’re sturdier long-term than cheap plastic. Need help choosing? Check our guide to the Best Food Storage Containers for Rice and Grains or explore stainless steel options in our Best Stainless Steel Food Storage Containers guide.

Products we use and recommend for this recipe:

Why the container matters

Packaging is as important as the cooking. Airtight containers with good seals keep moisture controlled so rice doesn’t dry out or turn gummy and vegetables stay crisp. For travelers or office lunches, leakproof compartments are helpful if you include sauces. If you want to save space while storing or transporting, collapsible containers can be a great choice—see our guide to the Best Collapsible Food Storage Containers for compact options.

What to expect from this recipe

The end result is 4–6 balanced meals (depending on portions) that reheat well in a microwave or on the stove. Flavors mellow slightly over time, which makes the dish a perfect canvas for quick finishing touches: a splash of soy sauce, a squeeze of lemon, fresh herbs, or toasted seeds. This method minimizes active time while maximizing fridge-ready results.

Tips and variations

1. Cook rice with a little extra broth (about 10% more liquid than usual) to prevent it from drying out in the fridge. Let it cool briefly before packing to avoid steam buildup in containers.

2. If you prefer, roast the chicken and vegetables on a sheet pan at 425°F for a hands-off approach—this concentrates flavor and gives a slight caramelization that holds up well during the week.

3. For gluten-free or dairy-free meal prep, use tamari instead of soy sauce and skip any butter finishes; olive oil works well for richness without allergens.

4. Want to freeze? Use freezer-safe glass or stainless steel containers and leave a little headspace for expansion; frozen meals are best within 2–3 months.

With equipment and storage choices in place, follow the structured ingredients and steps (below) to batch-cook your week of lunches. The recipe is intentionally modular—cook once, mix-and-match flavors all week.

Note: Ingredients, step-by-step instructions, nutrition facts, and storage directions are listed separately below for clarity.
Instructions

1

1. Rinse and cook the rice

Rinse the rice under cold water until the water runs mostly clear. Combine the rinsed rice and 4 cups of chicken broth or water in a pot or rice cooker. If using the stovetop, bring to a boil, reduce heat to low, cover, and simmer 15–18 minutes until liquid is absorbed. Remove from heat and let sit covered for 10 minutes, then fluff with a fork.

💡 Pro tip: Cooking rice with a bit extra liquid (about 10% more than usual) helps prevent it from drying out in the fridge.
2

2. Season and prep the chicken

Pat the chicken dry and cut into even pieces (about 1.5-inch chunks or leave whole for slicing later). In a bowl, toss with 1 tablespoon olive oil, smoked paprika, cumin, salt, and pepper. Let it sit while you prepare the vegetables.

💡 Pro tip: Cutting chicken into similar-sized pieces ensures even cooking and faster sear time.
3

3. Sear or bake the chicken

Heat a 12-inch skillet over medium-high heat with the remaining 1 tablespoon olive oil. Add the chicken in a single layer (don’t crowd the pan). Cook 4–6 minutes per side until golden and cooked through (internal temp 165°F/74°C). If baking, roast at 425°F for 18–22 minutes until done.

💡 Pro tip: A quick sear locks in juices—if pieces are crowded, cook in batches to keep a good crust.
4

4. Sauté the aromatics and vegetables

In the same skillet (add a splash more oil if needed), sauté diced onion until translucent, 3–4 minutes. Add minced garlic and cook 30 seconds, then add bell pepper and broccoli. Sauté until vegetables are tender-crisp, about 4–6 minutes. Season with a pinch of salt and pepper.

💡 Pro tip: If you prefer roasted vegetables, toss with oil and roast at 425°F for 15–20 minutes instead.
5

5. Combine and finish

Return chicken to the pan to warm through, or combine chicken, vegetables, and a splash of soy sauce/tamari for flavor balance. Taste and adjust seasoning. If you like a little brightness, squeeze fresh lemon over the mixture.

💡 Pro tip: Finishing with a teaspoon of soy sauce or a squeeze of lemon brightens the flavors without adding much sodium.
6

6. Portion into containers

Divide the cooked rice evenly among 6 meal prep containers, then top each with equal portions of chicken and vegetables. Let the meals cool uncovered at room temperature for up to 30–45 minutes, then seal and refrigerate.

💡 Pro tip: Avoid sealing hot food directly; trapped steam can create extra moisture and shorten shelf life.
7

7. Reheat and serve

Reheat meals in the microwave for 2–3 minutes (stir halfway) or reheat on the stove in a pan with a splash of water or broth. Garnish with fresh herbs, toasted sesame seeds, or a lemon wedge before serving.

💡 Pro tip: If microwaving, open the lid slightly or use a vented cover to allow steam to escape and prevent sogginess.
8

8. Optional freezing steps

If you plan to freeze portions, cool the food fully, then transfer to freezer-safe containers, leaving a little headspace. Label with the date and use within 2–3 months for best quality. Thaw overnight in the fridge before reheating.

💡 Pro tip: Freeze rice and chicken together for convenience, but if you want better texture, freeze rice and protein separately.

More to Cook

You Might Also Like

Weekly Meal Prep Bowl with Grains and Roasted Vegetables

A versatile, healthy weekly meal prep bowl featuring hearty grains, caramelized roasted vegetables, and a simple lemon-tahini dressing—perfect for busy weeks. Make-ahead friendly and easy to customize, these bowls store well in quality food storage containers for grab-and-go lunches or quick dinners.

View Recipe →

Vacuum Sealed Marinated Steaks

Make restaurant-quality steaks at home by vacuum sealing them with a bold marinade for deep flavor and fast, even marinating. This method uses airtight food storage solutions so steaks are tender, juicy, and perfect for grilling or pan-searing.

View Recipe →

Stay in the loop

Get the Best Kitchen Picks Delivered

New buying guides, honest reviews, and kitchen-tested recipes — straight to your inbox. No spam, ever.