
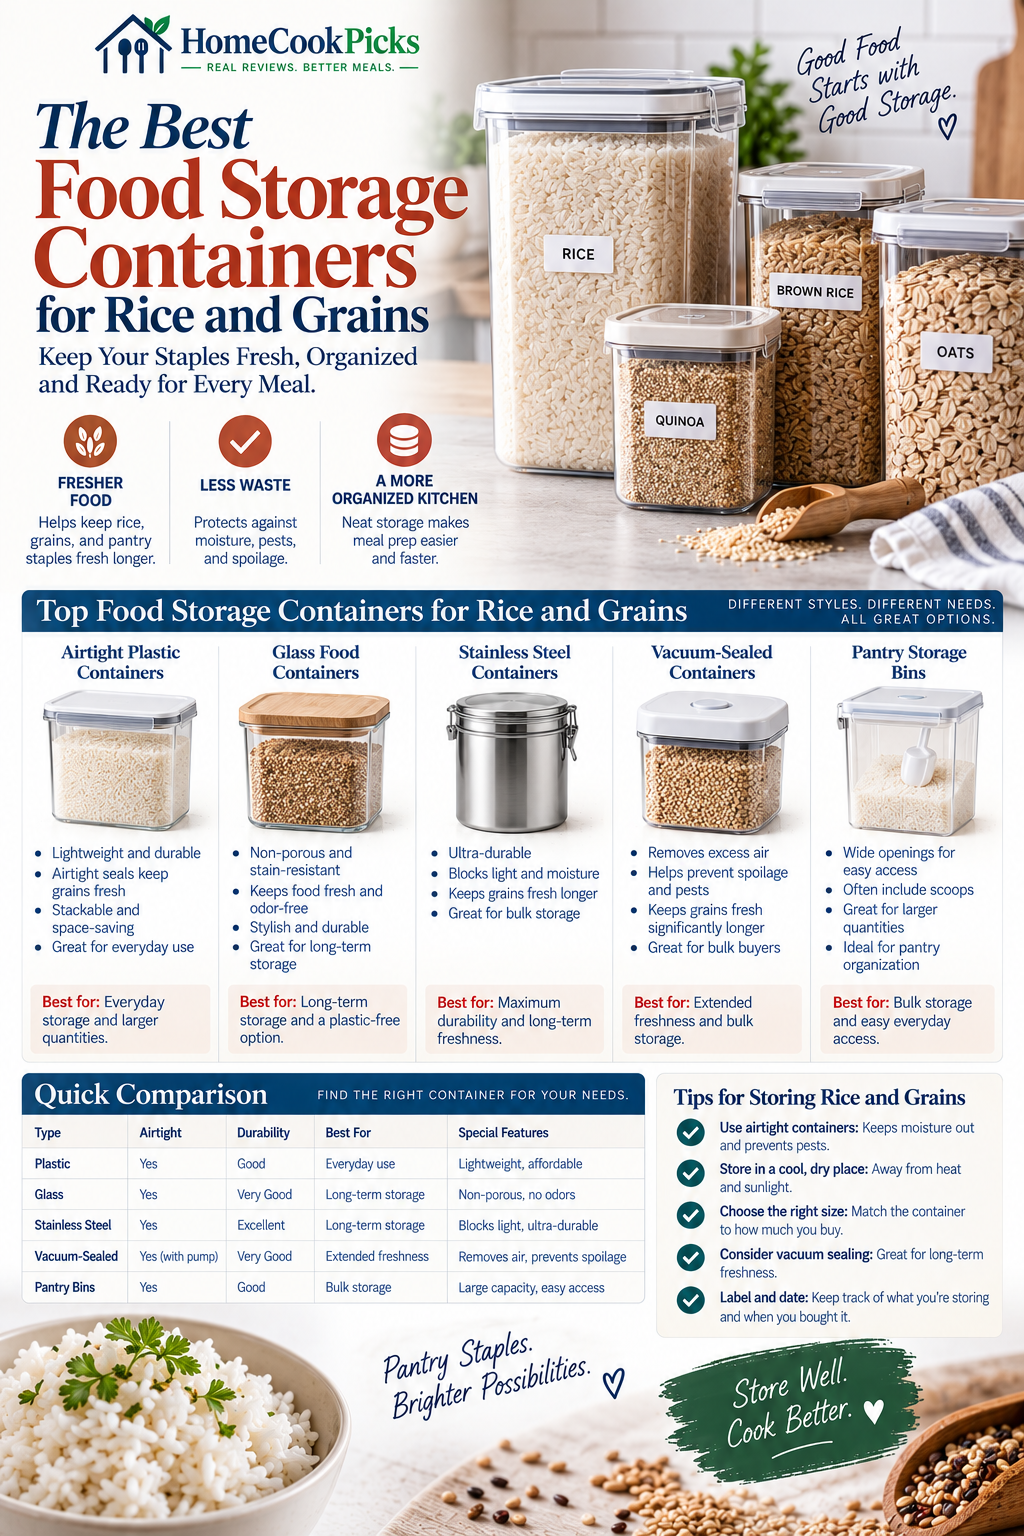
Four Decisions to Make Before Buying Containers
How much do you buy at once?
Match container capacity to your ordinary bag size. A larger vessel can hold a working supply, while a smaller companion can keep a frequently used grain close at hand.
Will you scoop or pour?
Wide openings generally support measuring cups and scoops. A more specialized dispenser may make sense only if it fits the way you portion dry goods.
Where will the containers live?
Measure shelf height and depth before choosing a system. The best container is one you can remove, refill, and clean without rearranging the entire pantry.
Which grains need daily access?
Put your most-used rice or grain in the easiest-to-reach container. Reserve smaller vessels for specialty ingredients and keep backstock separate and labeled.
Compare Five Containers for Rice and Grains
These are practical editorial matching notes rather than firsthand performance measurements. Confirm current dimensions, capacity, materials, care details, and availability in the product listing before purchasing.
| Best for | Container | Why consider it | Shop |
|---|---|---|---|
| Best all-around large canister | OXO Good Grips POP Container, 6-Quart | A large working-supply container for households that buy rice in bigger bags. | View on Amazon |
| Best clear pantry system option | Rubbermaid Brilliance Pantry Container, 6.4-Quart (Large) | A clear, stackable-looking choice for grouping several pantry staples. | View on Amazon |
| Best dedicated dry-goods keeper | Progressive Prepworks Flour Keeper Pro (6 lb), Grain Canister | A specialized shape for a frequently used dry ingredient. | View on Amazon |
| Best medium companion container | OXO Good Grips POP Container, 3.1-Quart (Medium) | A medium container for specialty grains or an active refill supply. | View on Amazon |
| Best glass option for smaller batches | Weck Round Glass Jars with Clip Lid, 1.0 Liter | A glass jar route for visible, smaller portions of dry goods. | View on Amazon |
Build a Rice and Grain Storage System That Works
Start with the goals, not the containers
Begin by clarifying what the storage system must accomplish in the kitchen: quick access for daily cooking, bulk storage for infrequent refills, a visible inventory so nothing gets forgotten, a way to pour dry grains without spills, and a layout that fits available shelf or counter space. Those goals should guide choices more than the latest trendy container. A practical system balances reachability, capacity, and the way ingredients are used in recipes.
Inventory common use cases
Make a brief list of how often different grains are cooked and how they are used. Examples: white rice as a daily side, brown rice used several times a week, rolled oats for weekday breakfasts, quinoa for a once- or twice-weeknight grain salad, dried beans in bulk for weekends. Frequency suggests the ideal placement and capacity for each item: daily staples deserve easy, mid-counter or eye-level access; occasional bulk bags can live higher on a pantry shelf.
Map storage to locations
Match items to locations based on cooking habits and kitchen layout. Typical zones include:
- Everyday zone: containers near the cooker or on a nearby open shelf for daily staples.
- Bulk zone: taller shelves or a pantry closet for large quantities and refill supplies.
- Prep zone: smaller containers or dispensers near food prep areas for oats and other frequently measured items.
Designing zones reduces needless handling and keeps the most-used grains within arm’s reach.
Decide on layered storage
Often a combination of container types works best. For example, use medium-sized canisters for what gets used most, and reserve large air-tight bins for bulk bags still awaiting transfer. Layered storage allows buying in bulk for cost savings while keeping everyday access convenient. Consider a simple method for transferring from bulk packages into everyday containers to avoid repeated heavy handling.
Plan for visual inventory
Choose containers and placement that make it easy to see quantities at a glance. Transparent or partly transparent sides, consistent container shapes, and uniform labeling all help. Clear sightlines reduce duplicate purchases and prevent long-forgotten bags from languishing on a pantry shelf.
Double-check product details
When selecting containers, confirm manufacturer details such as capacity, dimensions, lid design, and recommended care. These factors affect how containers stack, how much space they occupy, and how easy they are to use.
Choose Capacity From Your Real Shopping Habits
Measure use, not wishful thinking
Estimate the weekly consumption for each grain rather than guessing. Track how many cups of rice, oats, or beans are used during a typical week for a few weeks, or consult store receipts to see purchase frequency. That data helps select container sizes that match actual consumption. Avoid containers that are too large for items used sparingly, because partial fills can complicate measuring and storing.
Translate grocery cadence to container size
Once weekly usage is known, choose containers that will hold enough for a sensible refill interval — for many households that means a size that fits a one- to four-week supply. For example, if rolled oats are used daily, a container that holds several weeks of oats prevents constant refilling. Conversely, rare items like specialty grains can be stored in smaller containers to reduce oxidation of the remaining portion.
Consider common package sizes
Bulk packages and retail bag sizes vary. When buying containers, compare their internal capacity to common bag sizes to avoid constant transfers or wasted space. Leaving a bit of headroom simplifies pouring and measuring, so don’t aim for an exact fit between a full retail bag and container capacity.
Think about stacking and shelf depth
Container height and footprint must fit shelf dimensions. Tall narrow containers can maximize vertical space, while short wide ones may work better on low shelves or inside cabinets. Also consider whether lids or spouts interfere when stacking. Confirm product dimensions before purchasing so containers don’t become awkward to store.
Plan for future changes in habit
Household routines change — new diets, a houseguest, or a shift to more batch cooking can alter grain use. Where possible, choose a mix of container sizes to accommodate seasonal or lifestyle shifts without needing a full replacement of the system.
Labeling and fill-level practices
Match label size to container size so text remains readable. A simple labeling routine should include the item name and date of transfer or purchase, depending on preference. For very large containers, consider windows, graduated markings, or removable labels that can be updated as contents change. This helps with refill planning and reduces waste from forgotten quantities.
Container Features That Make Daily Use Easier
Lid and opening design
Lid design governs how quickly and cleanly grains can be accessed. Consider how the lid opens: wide openings help with scooping, narrow spouts are useful for pouring, and lids that flip or hinge can be convenient if they stay out of the way during use. Evaluate whether the lid design suits the most common action — scooping, pouring, or tilting — for each grain.
Pouring and scooping ergonomics
Look for containers with comfortable grips, pour spouts, or detachable scoops when frequent measuring is expected. A flat front or angled lip can reduce spills. Ergonomic considerations become more important for heavier containers that will be lifted regularly.
Seal mechanism and handler convenience
Lid seals vary: some use simple snap-on lids, others have gasketed closures or latch systems. A good seal reduces air exchange in daily use but also needs to be easy to open and close for routine access. If a threaded or latch-style lid will be opened dozens of times each month, prioritize a model that balances a secure closure with smooth operation.
Shape and stackability
Square or rectangular containers typically make better use of shelf space than round ones because they reduce wasted gaps. Stackability is helpful for limited vertical space, but ensure stacked units remain stable and accessible. If frequent access to the lower container is expected, ensure stacking won’t create heavy lifting or awkward reach situations.
Visibility and measurement aids
Transparent sides or built-in measurement markings simplify portioning and inventory checks. If opacity is preferred for aesthetics or light protection, consider containers with sight windows or removable panels so contents can still be assessed without opening.
Materials that suit daily habits
Each material—plastic, glass, or metal—has trade-offs related to weight, shatter risk, and perceived cleanliness. Choose materials that match daily handling preferences: lightweight, shatter-resistant options for frequent use in active kitchens; heavier, inert materials for stationary pantry storage. Confirm the material and any care recommendations from the manufacturer before purchase.
Maintenance-friendly details
Removable lids, wide openings, and smooth interior surfaces simplify cleaning. For containers used with oily or sticky grains, consider whether the interior shape will trap residue. Verify manufacturer cleaning guidance to be sure a chosen design fits kitchen routines and cleaning approaches.
Create a Simple Pantry System, Not a Container Collection
Standardize where possible
A streamlined pantry uses a handful of container types and sizes rather than a mismatched assortment. Standardized labels, shapes, and lid types make it easier to swap containers and maintain consistent handling. Uniform containers also create a tidier visual impression and simplify stacking and arranging on shelves.
Avoid over-equipping
Buying too many specialty containers can complicate rather than simplify pantry life. Start with essentials: a few medium containers for daily items, one or two larger bins for bulk backup supplies, and a couple of small containers for specialty grains or baking ingredients. Assess how the first set works in daily practice before expanding the collection.
Adopt simple tagging and labeling routines
Consistent labeling reduces the mental overhead of deciding what’s where. Labels should include at least the item name and a date marker that aligns with the chosen rotation system. Use a consistent location for labels—top, front, or lid—so information is easy to find during quick checks.
Establish a predictable refill rhythm
Design a refill routine that fits shopping habits: weekly, biweekly, or monthly. Stick to a predictable rhythm so a shopper can transfer from bulk bags to containers on a scheduled day, rather than in response to last-minute shortages. Consistency reduces impulse buys and the accumulation of duplicate items.
Keep a simple inventory list
Track pantry quantities with either a physical list attached to the pantry door or a quick note on a phone. A short list should include the name, approximate remaining quantity, and the next planned refill. This makes restocking straightforward without needing to open every container.
Use containers to clarify, not to hide
Containers should make it easier to see what’s available. Avoid transferring everything into opaque, unlabeled vessels that require opening to identify contents. If using non-transparent containers for aesthetic reasons, include a reliable labeling or window solution so contents remain obvious.
Plan for a few specialty items
Keep space for occasional specialty grains and beans that may not be used often. Small, clearly labeled containers for these items prevent cross-contamination and preserve the organization of daily staples. Treat those containers differently in the refill routine so they do not clutter the main rotation.
Plastic, Glass, and the Right Role for Each
Understand practical strengths and trade-offs
Plastic options are typically lightweight and less fragile; glass is inert, often heavier, and can be easier to inspect visually. Metal or other materials may appear in specialized storage. Each material has practical implications for handling, stacking, and cleaning. Choose materials that align with how containers will be used and stored in the kitchen.
When plastic makes sense
Plastic containers are often a good match for situations requiring frequent handling, portability, or storage in higher places where dropping a container could cause damage. They come in a range of shapes and features, such as integrated scoops or pour spouts. For repeated daily use, select plastic options with durable lids and smooth interiors. Confirm manufacturer guidance on cleaning and long-term use expectations before relying on a specific design.
When glass is preferable
Glass is valued for its nonreactive surface and ease of visual inspection. It can be a better fit for a pantry where containers remain stationary and visibility is important. Glass containers often communicate contents and remaining quantities clearly. Because glass is heavier and breakable, consider placement where dropping or frequent handling is unlikely.
Mix materials strategically
A mixed-material approach can capture the strengths of each material: use glass or ceramic for stationary items that benefit from visual clarity; use plastic for portable bins moved between pantry and counter; reserve metal or specialized materials for unique storage needs. The goal is a functional balance rather than a single-material collection.
Consider lids and seals independently of the body
Sometimes the lid material and design are more important than the body material. A sturdy lid that is easy to open, close, and maintain may justify pairing with a body material that optimizes weight and durability for the intended use. Always confirm how lids and bodies pair and whether replacements or additional lids are available.
Confirm care and compatibility
Care instructions and compatibility with dishwashers, microwaves, or freezers vary by material and manufacturer. Confirm current manufacturer directions regarding cleaning, temperature use, and potential staining with strongly colored foods. Selecting materials that match kitchen habits reduces future frustration.
Care, Cleaning, Rotation, and Pantry Maintenance
Keep cleaning practical and regular
Regular cleaning prevents odors and residue build-up. Wipe or wash containers after emptying and before refilling. For frequent-use containers, a weekly wipe-down of lids and rims can prevent grit from building up. When deep cleaning is needed, fully disassemble lids where possible to access crevices. Always consult manufacturer guidance for recommended cleaning methods.
Simple rotation rules
A rotation system helps keep stash fresh and ensures older grain supplies are used before newer ones. A basic approach:
- Label containers with a transfer or purchase date.
- Use oldest-opened containers first when cooking.
- Refill containers from bulk stock by moving oldest bulk bags forward.
This sequence keeps usage predictable without adding complexity to meal prep.
Refilling without chaos
When transferring from bulk packages, use a clean scoop and a stable work surface. Consider using a funnel or wide-mouth transfer method to reduce spills. Work over a tray or sink when practical. After transferring, wipe container rims and lids before re-sealing. Keep a designated transfer day to consolidate effort and clean up in one session.
Simple maintenance checklist
A few minutes each month can prevent bigger problems later. A suggested checklist:
- Check labels and update dates when refilling.
- Inspect containers for chips, cracks, or compromised closures.
- Wipe shelves and reorganize by frequency of use.
- Rotate bulk stock forward and note low-quantity items on an inventory list.
These small steps keep a pantry orderly and reduce waste from forgotten items.
Addressing spills and stuck residues
For sticky residues, soak removable parts in warm water before washing. Use a soft brush for crevices and avoid abrasive cleaners that may scratch surfaces. If using containers for oily grains, consider a brief warm-soap soak before rinsing. Again, verify manufacturer cleaning suggestions for the specific container model before using any particular cleaning method.
Replacing and retiring containers
Inspect containers periodically for wear and replace any that are cracked, warped, or no longer close reliably. Replacing a single problematic container is usually more economical than trying to force compatibility with a worn seal. Keep an eye out for replacement lids or parts from the manufacturer where available to extend service life.
The Best Container Is the One You Will Use Well
Prioritize daily usability over theoretical performance
The ideal container aligns with regular behavior: if a lid is difficult to open, it will be avoided; if a container requires delicate cleaning, its use may drop. Choose solutions that integrate into everyday routines and make common tasks—measuring a cup of rice, scooping a handful of oats—easier. Practical convenience beats theoretical superiority in long-term kitchen use.
Test a small set before committing
Rather than buying an entire matched set at once, consider starting with a few containers that cover the most frequent needs. Observe how they perform for a month: are they easy to open when hands are wet, do lids stay marked, is pouring neat? This trial approach reduces the risk of ending up with a full collection that doesn’t suit daily patterns.
Let ergonomics guide choices
Think about how containers feel when handled: grip comfort, lid action, and weight when partially full. An ergonomic fit reduces the likelihood of drops and spills and makes the system pleasant to use. For households with varying user strengths and heights, prioritize designs that are accessible to everyone who will use them.
Make labels and location work for habits
A box of well-labeled containers means shoppers can quickly spot when a staple is low. Position frequently used containers at a consistent, reachable height, and keep measuring tools nearby. If recipes or routines require certain grains to be together, store them as a subgroup to avoid hunting during meal prep.
Adapt as habits evolve
Regularly reassess the system. New culinary habits, changes in household size, or different shopping patterns may call for swapping container sizes or reshuffling pantry zones. A flexible approach—maintaining a few spare containers and an open shelf for overflow—makes adaptation straightforward.
Confirm details before purchase
Before buying, review the manufacturer’s current information on capacity, dimensions, lid/seal design, materials, and care. Matching product details to the planned layout and handling expectations prevents surprises and supports a system that will be used well every day.
Closing thought: keep it maintainable
The most effective grain storage system requires minimal fuss. Aim for choices that reduce the number of decisions during busy meal prep—clear labeling, familiar locations, and containers that are pleasant to use. A maintainable system is more likely to remain organized and to support the kitchen routines that matter most.
Build a Better Everyday Storage Routine
Use these HomeCookPicks guides to compare container materials and set up storage for other kitchen routines.


