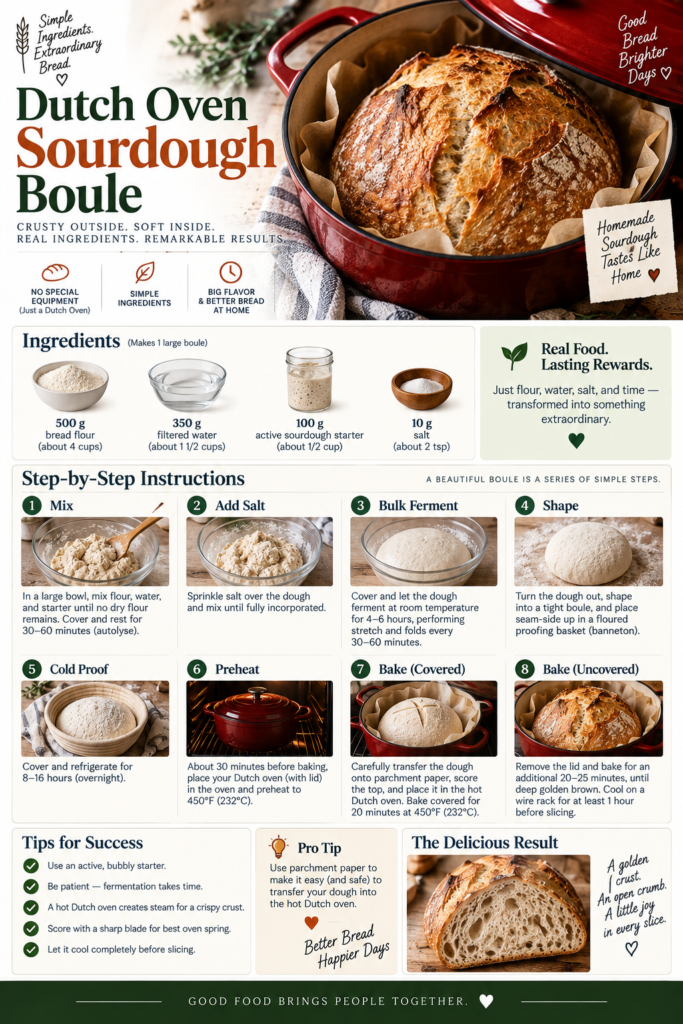
Sourdough baking at home can feel like magic: a handful of simple ingredients transforms into a loaf with a chewy open crumb, tangy flavor, and a crust that crackles when you slice into it. The Dutch oven boule is one of the most reliable ways to replicate bakery-style bread in a home kitchen. The heavy lidded pot traps steam during the first part of baking, producing the moist environment needed for strong oven spring and a glossy, blistered crust.
This recipe focuses on a straightforward method and a 500 g flour dough that yields one 9-10 inch boule. You don’t need specialized equipment beyond a sturdy Dutch oven, and you’ll learn how timing, hydration, and gentle handling produce a loaf with both structure and tenderness. The technique works because the cast-iron or enameled pot creates even heat distribution and a sealed environment that mimics a professional steam-injected oven—key to a deeply caramelized crust and well-developed crumb.
Why this method works
Two things make the Dutch oven boule especially dependable for home bakers: steam retention and thermal mass. The covered Dutch oven traps the moisture released from the dough and circulates it back into the loaf during the initial bake, which delays crust formation and allows bread to expand fully. After removing the lid, the exposed surface dries quickly and browns beautifully, creating the characteristic deep color and crunch.
Another advantage is temperature stability. A heavy pot holds heat consistently so the loaf receives steady, intense heat from all sides. That encourages a crisp exterior and a well-cooked interior without the burned bottom or pale top that can happen on a sheet pan.
Choosing the right equipment
For this recipe the Dutch oven is the star. Look for a 4–6 quart enameled cast-iron pot with a tight-fitting lid: it should be heavy enough to trap steam and large enough to hold your shaped boule with a little room to expand. If you bake often, consider a model with a wide base and straight sides for even oven spring. You can shop common options on Amazon (Dutch Oven 6 Quart) and pair it with a reliable kitchen scale and banneton to shape and proof the loaf:
If you’re interested in choosing cookware with attention to materials and finishes, our guide to Best Non-Toxic Cookware: PFAS-Free Pans outlines safe, durable options that include enameled cast iron and other finishes worth considering. For those comparing premium cookware approaches and construction, the HexClad vs All-Clad guide offers helpful buying criteria that apply when selecting long-lasting kitchen investments.
What to expect
This method produces a loaf with a crisp, deeply colored crust and a tender, open crumb if you handle the dough gently and respect fermentation times. Expect most of the work to happen during bulk fermentation and proofing—those are largely hands-off. Active work (mixing, folding, shaping) takes about 30–45 minutes spread over the day, then the oven does the rest.
Plan ahead: sourdough takes time. You’ll need an active starter and a schedule that accommodates a 3–6 hour bulk fermentation (or longer if you prefer a slow, cool ferment) and a final proof that can be 45 minutes to overnight in the fridge. The results are worth the wait.
Tips and variations
Here are practical tips and a few ways to customize your boule:
- Use a digital kitchen scale for consistent results—measuring by weight is more reliable than cups when it comes to bread baking.
- If you don’t have a banneton, proof the loaf in a well-floured bowl lined with a clean kitchen towel; dust liberally with rice flour to prevent sticking.
- For extra flavor, add up to 20% whole-grain flour (rye or whole wheat) at the expense of white bread flour; increase hydration slightly if using whole grains.
- To develop more complex flavor, cold-proof the shaped loaf in the refrigerator for 12–24 hours and bake straight from cold—the extended ferment enhances tanginess and oven spring.
Serving and finishing
Let the loaf cool at least 1 hour before slicing to finish the interior setting process; cutting too early yields a gummy crumb. A sharp serrated bread knife produces the cleanest slices. This boule is excellent with butter, olive oil and sea salt, or as the base for sandwiches, soups, and slow-simmered stews.
Common troubleshooting
If your loaf spreads too much, it may be underproofed or overhydrated—try shorter bulk fermentation or a firmer shape. A pale crust often indicates insufficient preheating; always preheat the Dutch oven inside the oven for at least 30 minutes to ensure proper surface browning. If the crumb is too dense, extend bulk fermentation and perform more coil folds during the first two hours to strengthen the gluten network.