Homemade Cashew Cream
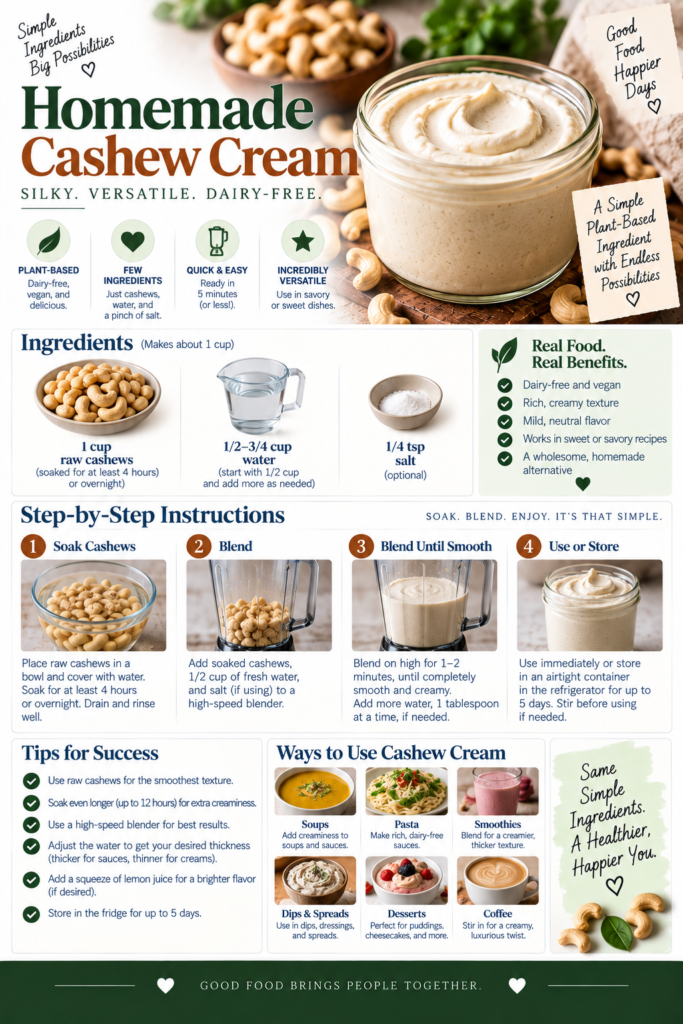
Cashew cream is one of those kitchen transformations that feels almost like culinary magic: a handful of raw nuts plus water, and a blender turns them into a silky, neutral cream that can replace dairy in countless recipes. Its richness comes from the natural fats in cashews, while its mild flavor makes it a perfect canvas for sweet or savory finishes.
What makes this method special is its simplicity and flexibility. With just a short soak (or a quick boil for same-day use) and a high-speed blender, you can create cashew cream that’s smoother than most store-bought alternatives and free of stabilizers and added sugars. Because the recipe is forgiving, you can adjust thickness from pourable cream to a spoonable “sour cream” texture, making it a go-to for everything from pasta sauces to frosting.
Why This Recipe Works
Two things make a successful cashew cream: soft cashews and enough liquid. Soaking softens the nuts and helps the blender extract the fat and proteins that create a stable emulsion. Using a powerful blender breaks the cashew particles into an ultra-fine suspension so the finished cream feels velvety rather than grainy. A small amount of acid (like lemon juice) brightens the flavor and helps the cream behave more like cultured dairy in recipes.
Because the base is neutral, you can tailor the final result easily: add salt and lemon for a savory replacement, vanilla and maple for a sweet topping, or herbs and garlic for a dip. The flexibility and clean ingredient list are why many cooks prefer making cashew cream from scratch.
Choosing the Right Equipment
A good blender is the single most important tool for silky cashew cream. High-speed blenders reach the RPM and blade circulation you need to fully emulsify cashews with minimal water. If you’re shopping, compare models and features to match your budget and how often you’ll use it—our guide to the Best Blenders for Smoothies is a great place to start.
If you prefer specific brands, our head-to-head overview Vitamix vs Ninja: Which Blender Brand Should You Buy? outlines pros and cons for frequent home cooks. For a quick shopping option, check a couple of high-performance models on Amazon: a popular choice is a Vitamix-style high-speed blender (search Vitamix blenders) and a budget-friendly powerhouse from Ninja (search Ninja blenders).
Other handy tools: a fine-mesh strainer or nut-milk bag for ultra-smooth results (optional), and a rubber spatula to scrape the blender jar clean. For freezing portions, silicone ice cube trays work well for convenient single-serving cubes.
How to Use Cashew Cream
Once you have a batch of cashew cream, use it in any place where you would use heavy cream, sour cream, or a neutral dairy base: curry sauces, creamy dressings, mashed potatoes, vegan cheesecakes, coffee creamer, and more. Because it’s stable and rich, it can also be reduced gently on the stove to concentrate flavor for sauces.
Tips & Variations
1. Quick soak method: If you forget to soak cashews overnight, boil them gently for 15 minutes, then cool and blend—the result is nearly as smooth as an overnight soak.
2. Texture control: Start with less water and add more while blending to reach the exact consistency you want—use 3/4 cup for thicker cream and up to 1 1/4 cups for a pourable creamer.
3. Flavor variations: For a savory cream, blend with a small clove of garlic, a squeeze of lemon, and a pinch of salt. For desserts, add vanilla and maple syrup or a splash of almond extract.
4. Strain for ultra-smooth results: If you need perfectly smooth cream for silky sauces or custards, press the blended mixture through a fine-mesh sieve or a nut-milk bag.
Serving Suggestions
Serve cashew cream dolloped onto soups, folded into mashed potatoes, swirled into coffee, or used as the creamy base for vegan cheesecakes and frostings. It’s an especially good match for spicy dishes where the neutral richness mellows heat without adding competing flavors.
Safety & Food Notes
Always use fresh, raw cashews for best flavor and texture. Roasted or salted nuts will change the taste and salt level. If anyone has a tree-nut allergy, do not substitute—cashew cream is not safe for those with cashew or tree-nut sensitivities.
With the right blender and a few simple steps, homemade cashew cream is an economical, versatile, and delicious alternative to dairy-based creams. It stores well and can be portioned for convenience, making it a smart staple for plant-based and regular kitchens alike.
Ready to try it? Scroll down for the full ingredient list, step-by-step instructions, and nutrition details.