
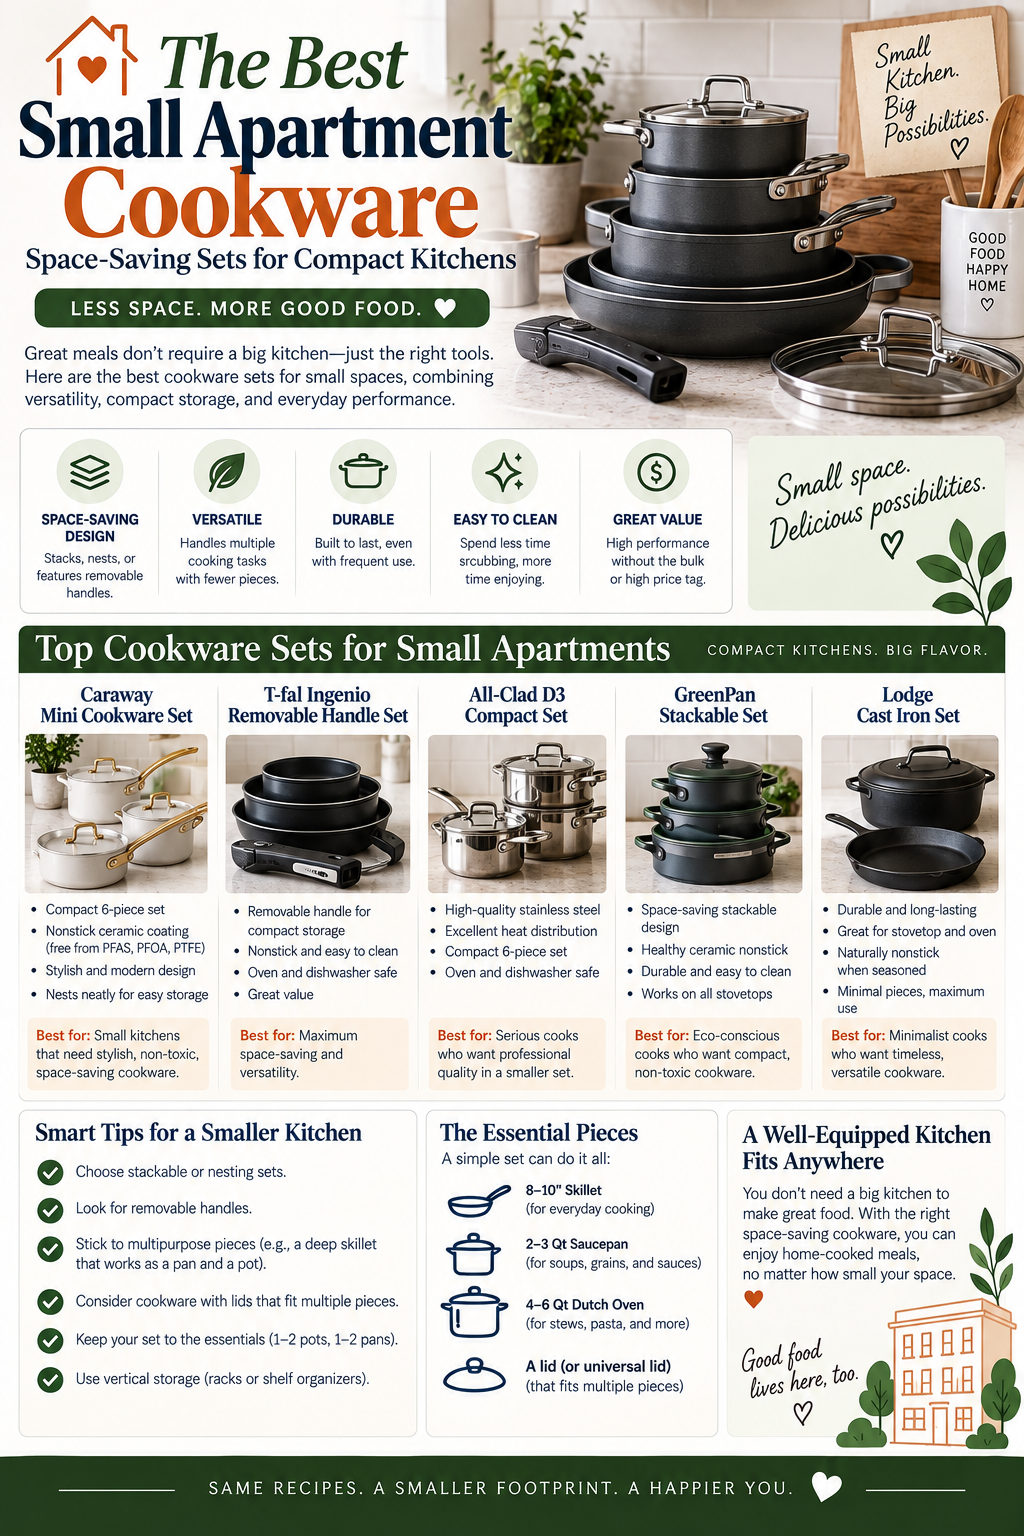
Make the Storage Decision Before the Material Decision
Measure the place where cookware will live
Cabinet depth, drawer clearance, shelf height, and the space needed to lift a lid decide whether a standard set will actually be convenient.
Choose a handle strategy
Fixed handles feel familiar; detachable handles can reduce the footprint. Pick the system you will realistically use and maintain.
List your weekly cooking tasks
Eggs, pasta, sauces, sheet-pan dinners, soups, and batch meals call for different workhorse pieces. Buy for your routine, not a set’s headline count.
Confirm the cooktop
Check whether your apartment uses induction, gas, electric coil, or radiant electric before treating compatibility as an afterthought.
Five Ways to Build a Compact Cookware Setup
These selections come from an editorial review of current manufacturer documentation, the storage challenges of compact kitchens, and the distinct needs of small-batch, fixed-handle, detachable-handle, induction, and conventional stainless shoppers. HomeCookPicks has not physically tested these products. Confirm current specifications, availability, and care directions on the linked product pages before purchasing.
| Best for | Product | Why consider it | Shop |
|---|---|---|---|
| Most space-focused full cookware set | Cuisinart ClickSmart Nonstick Detachable Handle Cookware, D53C-13DG | The documented removable-handle, stackable design directly addresses cabinet constraints while covering more cooking tasks than a two-pan setup. | Check current price |
| Traditional nesting with attached handles | Tramontina Nesting 11 Piece Nonstick Cookware Set, 80156/042DS | It is a documented nesting set for a cook who wants attached handles but still wants the cookware to organize into a compact stack. | Check current price |
| Induction-compatible detachable-handle alternative | T-fal Ingenio Essentials 11 Piece Induction Cookware Set, L836SB64 | The current model combines detachable handles, a compact stack, and documented induction compatibility for a small kitchen with an induction cooktop. | Check current price |
| One- or two-person small-batch cooking | Caraway Minis Duo Ceramic-Coated Mini Fry Pan and Sauce Pan | The documented 8-inch fry pan and 1.75-quart saucepan make it a deliberately compact two-piece approach rather than an oversized set with unused pieces. | Check current price |
| Conventional stainless essentials with adequate cabinet room | Cuisinart Chef's Classic Stainless 10 Piece Set, 77-10P1 | It gives a cook a defined stainless-steel set with core pan types, but it belongs only in an apartment with enough cabinet space for conventional handles and a larger stockpot. | Check current price |
Build a Small-Apartment Cookware Plan That Fits
Quick purchase decision: for most small apartments, buy a compact, multi‑use cookware kit centered on a small lidded saucepan (1.5–2 quarts), one medium lidded pot or sauté pan (3–4 quarts), and two skillets that nest or stack (8–10-inch and 10–12-inch). Add a single set of lids that fit multiple pieces and prioritize either a detachable handle or short, well‑balanced long handles so storage depth and clearance are minimized. This minimal set covers stovetop cooking, simple sauces, one‑pot meals, and small batch baking or oven finishing without cluttering cabinets.
This article gives a practical framework for choosing exact sizes, materials, handle architecture, and storage strategies for renters, studio residents, dorm cooks, first‑time home cooks, or anyone with limited cabinet and counter space. The priority is compact storage, capacity that matches typical portion sizes, cooktop compatibility (gas, electric, induction), care needs, and avoiding sets with many rarely used pieces.
How this guide helps
- Start from what you actually cook and translate that into a compact, multi‑functional inventory.
- Decide storage architecture (how and where cookware will live) before picking materials.
- Balance materials, weight, and care with your daily routine and cleaning willingness.
- Choose the fewest pieces that reliably cover the most jobs.
Start With the Cooking You Actually Do
Before buying anything, list the meals you make most often and how many people you usually cook for. That small upfront audit removes guesswork and prevents accumulating rarely used specialty pans.
Decision questions
- Who are you cooking for? Solo, two people, family, intermittent entertaining?
- How often do you roast or bake vs. stovetop sautés, one‑pot meals, or soups?
- Do you use a microwave, toaster oven, or space oven that reduces stovetop reliance?
- Are you likely to reheat leftovers or cook fresh each meal?
Translate answers to specific needs:
Typical cooking profiles and needs
- Solo or student cook: minimal stirring/sautéing, single servings, quick sauces. Needs: one small skillet, one small lidded saucepan, and a multipurpose lid.
- Two people who cook nightly: want to make one‑pan meals, sauces, and occasional pasta. Needs: two nestable skillets and a 3–4 qt lidded pot or sauté pan.
- Occasional entertainer: want a versatile pot that handles soups, pastas, and small roasts. Needs: a 4–6 qt lidded pot or Dutch‑oven substitute plus nesting skillets.
- Home baker/serious cook: values heat control and oven capability. Needs: a heavy pan option (carbon steel or cast iron or oven‑safe stainless) and a good sauté pan.
Make your list concrete: write out a week’s typical dinners and which pan(s) each requires. That immediately highlights duplicates you can avoid and the true minimum inventory that fits your life.
Choose Storage Architecture Before Materials
Where cookware will live determines what you can buy. Storage constraints are the single most important factor in a compact kitchen—measure first, then shop. Decide whether cookware will be stored stacked in a cabinet, on open shelving, hung on a rail, kept in a deep drawer, or sometimes left on the stove.
Measure and map
- Measure cabinet width, depth, and vertical clearance between shelves with lids on and off. Note door swing and obstructions.
- Measure drawer depth and internal divider locations if you plan to store flat or stacked in drawers.
- Note wall space for a rail or pegboard and the load limits for hooks.
- Check oven and microwave interior dimensions if you plan to use pans there for finished dishes.
Storage styles and implications
- Stacking/Nesting: Best for maximizing volume. Choose pans with consistent diameter steps so they nest without bending lids. Look for pans that stack flush and allow a lid to nest inside or store lids separately.
- Vertical divider racks: Good for a few pans. Allows lids to be stored upright adjacent to pans but takes more linear shelf space.
- Hanging or rail storage: Great for open kitchens. Requires handles or hanging loops on lids and pans. Ensure handle length is compatible with rail spacing and ceiling height.
- Drawer storage: Shallow drawers require shorter handles or removable handles. Deep drawers allow stacking but need pan protectors to avoid scratches.
- Countertop staging: Leave one everyday skillet or small pot on a low‑profile pan rack on the counter for immediate access, if counter space allows.
Storage architecture influences handle choices and lid management more than material does. For compact kitchens, prioritize stackability and shared lids over matching material or finishing options.
Pick Materials Around Your Routine
Materials determine cooking performance, weight, maintenance, cooktop compatibility, and longevity. Each has trade‑offs that matter more in a small apartment where space, cleaning habits, and storage frequency are constraints.
Nonstick (PTFE/ceramic-like coatings)
- Pros: Easiest cleanup, low oil needed, good for eggs and low‑fat cooking. Lightweight and often available in nesting sets with shallow profiles for stacking.
- Cons: Coating lifespan depends on use and cleaning. Avoid high heat and metal utensils. Often not suitable for high‑temperature oven use; check handle and coating heat limits.
- When to choose: If quick cleanup and low‑fat cooking are priorities and you dislike scrubbing.
Stainless steel
- Pros: Durable, oven safe, tolerant of metal utensils, good for browning and deglazing. Thin‑gauge stainless is lightweight; multi‑ply (clad) offers better heat distribution.
- Cons: Can stick with delicate foods if not used with correct heat and oil. Clad cookware is heavier and takes more space to store if thicker.
- When to choose: If you make sauces, sear meats, and want a long‑lasting, low‑reactivity option that tolerates higher heat.
Hard‑anodized aluminum
- Pros: Hard, scratch‑resistant, good heat conduction, typically lighter than clad stainless, often available with durable nonstick surfaces.
- Cons: Not magnetic by default (induction may require a ferrous base). Some finishes require gentle care to maintain appearance.
- When to choose: If you want a durable, lightweight pan with better heat distribution than thin stainless.
Carbon steel and cast iron
- Pros: Exceptional heat retention and durability. When seasoned, both offer natural nonstick properties and oven/ broiler safety (if handles allow).
- Cons: Heavy—cast iron especially—and requires maintenance (seasoning, drying, oiling). Not ideal if you need low‑weight, stacked storage.
- When to choose: If you do high‑heat searing, frequent oven finishes, or prefer a pan that doubles as a serving piece and long‑term heirloom. Carbon steel is lighter than cast iron and nests more easily.
Aluminum (bare) and ceramic coatings
- Pros: Bare aluminum is a great heat conductor and light. Ceramic coatings offer a PTFE‑free nonstick feel.
- Cons: Bare aluminum can react with acidic foods; ceramic coatings can fade and often require similar care to PTFE nonstick.
- When to choose: If weight is a big concern and you avoid highly acidic long simmers, or if you need a PTFE‑free nonstick and are willing to replace sooner.
Cooktop compatibility checklist
- Gas: Most materials are compatible. Watch for warped bottoms with thin pans on high flames; flame should not extend up the sides.
- Electric coil: Similar to gas but ensure flat bottoms for stable contact.
- Glass‑ceramic top: Choose flat, smooth bottoms to avoid scratching and improve heat transfer; avoid pans with warped bases.
- Induction: Requires a magnetic base. Look for pans that explicitly state magnetic compatibility or use a magnet to test the bottom. Some lightweight aluminum or copper pans may need an induction plate.
In compact kitchens, prioritize a small number of materials that cover your cooking needs. Many renters opt for one easy‑care nonstick skillet for daily eggs and a small stainless or hard‑anodized pot for sauces and occasional searing; add a heavier pan only if you regularly finish dishes in the oven or need high heat.
Make Fewer Pieces Cover More Jobs
Space‑constrained kitchens benefit from a deliberate, job‑driven inventory. Avoid large “kitchen complete” sets that include specialized gadgets and redundant lids. Instead, pick pieces that double up and nest efficiently.
Core pieces that maximize capability
- Small lidded saucepan (1.5–2 qt): Sauces, grains for 1–2 people, reheating, and small stews.
- Medium lidded pot or sauté pan (3–4 qt): One‑pot meals, pasta for two, shallow braises, and pan sauces.
- Two nesting skillets (8–10″ and 10–12″): Sautéing, frying, omelettes, searing, and finishing in the oven if necessary. Nesting reduces cabinet depth requirements.
- One multipurpose lid strategy: Lids that fit multiple diameters, or a small set of lids (e.g., 8″ and 10–12″) to cover several pots and pans.
- Optional: A 4–6 qt lidded pot only if you regularly cook soups or larger pasta portions; otherwise, the 3–4 qt pot often suffices.
Suggested minimal kits by cook style
Minimalist solo cook (very small storage)
- 8–10″ nonstick skillet (daily use)
- 1.5–2 qt lidded saucepan
- One versatile lid that fits both
Everyday two people (compact but flexible)
- 8–10″ and 10–12″ nesting skillets (one nonstick, one stainless or hard‑anodized)
- 2–3 qt covered saucepan
- 3–4 qt lidded sauté/pot that doubles as a small Dutch oven
- Two lids that overlap in fit
Budding cook who wants oven capability
- 10–12″ oven‑safe skillet (carbon steel or cast/seasoned option)
- 3–4 qt lidded stainless or enamel pot
- 8–10″ nonstick for delicate foods
Handle architecture and why it matters
Handles affect storage depth, oven use, and ergonomics. Consider these features and their trade‑offs:
- Long fixed handles: Comfortable and safe for stovetop work, but increase depth when hanging or storing and may make oven storage awkward.
- Short handles or two‑handled sautés: Shorter storage profile and better for oven use, but may be less convenient for one‑handed cooking.
- Detachable handles: Excellent for saving space and making pans stackable and ovenable. Trade‑offs include one more component to lose and sometimes reduced stability for heavy pans.
- Folding handles: Save space but add moving parts that can loosen; check durability and locking mechanism before relying on them for heavy pans.
For compact kitchens, detachable or short, flat handles often yield the best balance between safe daily workflow and storage volume.
Reduce lid clutter
- Favor a few lids that fit multiple pots and pans. Choose lids with low profiles so they stack with pans or nest inside them.
- Consider an internal lid storage plan: store lids in a vertical divider, hang them on a rail, or nest them inside the largest pot when not in use.
- Silicone lid protectors and pan separators help when stacking nonstick surfaces to avoid scratches.
Care, Maintenance, and Moving-Day Considerations
In a small apartment, cookware maintenance and moving logistics directly affect daily life. Lightweight, low‑maintenance cookware reduces dishwashing friction and makes moving less stressful.
Cleaning and day‑to‑day care
- Nonstick: Clean with soft sponges and mild detergent. Avoid cooking sprays that can build up residue; use a little oil instead. Replace if coating flakes or performance degrades.
- Stainless/clad: Deglaze with liquid (wine, stock, or water) to lift stuck bits. For discoloration, a paste of baking soda and water can help without damaging the finish.
- Cast iron/carbon steel: Dry immediately after washing, reapply a thin oil layer, and store dry. Avoid dishwasher use. Re‑season periodically when food stops sliding.
- Hard‑anodized and ceramic coatings: Use non‑abrasive cleansers. Avoid sudden temperature shocks (very cold water on a hot pan) to prevent warping.
Stacking and storage care
- Use pan protectors, inexpensive felt or silicon pads, or folded kitchen towels between stacked pans to prevent scratches, especially for nonstick surfaces.
- Store lids vertically when possible to reduce stack height and allow airflow.
- Avoid wet storage; trapped moisture between stacked pans promotes rust on seasoned or bare steel cookware.
Moving‑day and portability tips
- Choose a few multi‑purpose pieces to reduce the number of boxes and total weight.
- Remove detachable handles and pack separately; wrap lids and pans in towels to protect finishes.
- Pack cast iron or heavy pans in small boxes so weight is manageable and distributed evenly during moves.
- Label boxes for “fragile cookware” and indicate which lids belong with which pans to speed unpacking in a small kitchen.
Plan maintenance to match your lifestyle. If you hate scrubbing, prioritize nonstick and easy‑clean stainless over cast iron. If you move often, avoid very heavy or awkwardly shaped pieces and favor detachable handles and nesting designs.
A Practical Buying Path for Compact Kitchens
Use this step‑by‑step checklist when shopping to arrive at a compact, capable set that fits your space and cooking life. Work down the list in order so earlier decisions inform later ones.
Step 1 — Measure and map your storage
- Measure cabinet and shelf height and depth with lids on and off. Note drawer depth and available wall hanging space.
- Decide where the everyday skillet/pot will live for quick access and confirm it fits that spot with handle attached (or detached if you choose removable handles).
Step 2 — Define your cooking profile
- Write down the most common weeknight meals and portion counts. Convert them into pan sizes and capacities (see core pieces above).
- Decide whether you need oven capability and at what temperatures.
Step 3 — Select materials that match care tolerance
- Choose nonstick if you prioritize low effort cleaning. Choose stainless or hard‑anodized for versatility and higher heat cooking. Choose carbon steel or cast iron for searing and oven work if you are comfortable with seasoning and weight.
- If you have induction, explicitly require magnetic compatibility.
Step 4 — Choose handle architecture for storage and safety
- If drawer or shallow shelf storage is required, prioritize detachable or short handles. If you hang pans, ensure handle length is compatible with your rail spacing and ceiling height.
- Confirm handle material and fastening method if buying detachable options—simplicity and a secure lock mechanism are crucial for heavy pans.
Step 5 — Minimize piece count and maximize overlap
- Aim for a grouping where one lid covers multiple pans and one pan can perform at least three roles (sear, sauté, finish in oven) where possible.
- Avoid buying sets with many specialty items you don’t use. Extra lids, steamers, and inserts are the usual clutter creators in small kitchens.
Step 6 — Confirm cooktop compatibility and oven limits
- On induction, test magnetic attraction or confirm manufacturer claims. For glass‑top stoves, look for flat, smooth bases.
- Check maximum oven temperatures and whether handles are oven‑safe if you plan to finish dishes in the oven.
Step 7 — Finalize storage accessories and care plan
- Buy a small set of pan protectors, a vertical lid organizer or low‑profile lid rack, and drawer dividers if storing pans in drawers.
- Decide on cleaning tools (soft sponges, chainmail scrubber for stainless, seasoning oil for cast iron) and store them near the sink.
Prioritization and trade‑offs
When space is the constraint, prioritize in this order: (1) pieces that cover your daily meals, (2) stackability and nesting, (3) handle architecture that enables chosen storage, (4) material that fits your cleaning habits, and (5) oven capability if you actually use it. A heavier, highly versatile pan may be worth its space if it replaces three lighter pans, but avoid heavy items that will be stored infrequently and make daily access a chore.
Final reminder: measure before you buy, make an honest list of weekly meals, and prefer multi‑purpose pieces that nest or stack. That approach saves cabinet space, reduces upkeep, and keeps the small kitchen functioning smoothly.
Manufacturer Documentation Reviewed
These current manufacturer pages were reviewed for model identity and the product-specific facts used in the recommendation cards. They are provided as research sources, not as purchase links. Product availability, configurations, specifications, warranty terms, and care directions can change, so confirm the current details before buying.
- Cuisinart ClickSmart Nonstick Detachable Handle Cookware, D53C-13DG manufacturer documentation
- Tramontina Nesting 11 Piece Nonstick Cookware Set, 80156/042DS manufacturer documentation
- T-fal Ingenio Essentials 11 Piece Induction Cookware Set, L836SB64 manufacturer documentation
- Caraway Minis Duo Ceramic-Coated Mini Fry Pan and Sauce Pan manufacturer documentation
- Cuisinart Chef's Classic Stainless 10 Piece Set, 77-10P1 manufacturer documentation
Continue Planning a Compact Kitchen
These HomeCookPicks guides can help you select the right material, pan style, and storage approach once you have narrowed the shape of your small-space setup.


