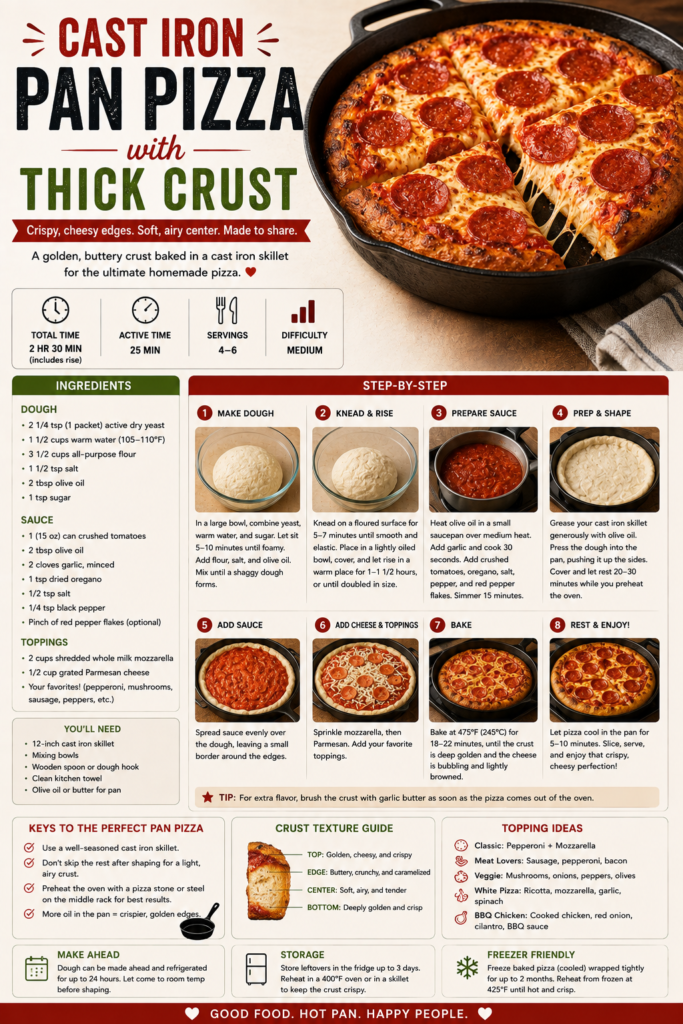
Cast Iron Pan Pizza with Thick Crust

Make a restaurant-style thick-crust pizza at home using a cast iron skillet—crispy bottom, pillowy interior, and loaded with your favorite toppings. This easy method uses a simple dough, a hot preheated skillet, and a few tips for perfect texture every time.

30 min Prep Time
18 min Cook Time
48 min Total Time
4 Servings
Medium Difficulty

Ingredients

Servings:
4
Nutrition (per serving)
Calories 700 kcal
Protein 28g
Fat 30g
Carbohydrates 80g
Fiber 4g
💾 Storage

Cool pizza completely, then wrap tightly in plastic wrap or store in an airtight container in the refrigerator for up to 3 days. For longer storage, freeze individual slices on a sheet pan until solid, then transfer to a freezer bag for up to 2 months. Reheat refrigerated slices in a 375°F oven for 8–12 minutes or in a skillet over medium heat until warmed through to preserve crust crispness.

🍳

Best Made With: Cast Iron Skillet

Choose a heavy 10–12 inch pre-seasoned cast iron skillet with a flat base to ensure even heat and a crisp crust.

See Our Top Cast Iron Skillet Picks →

Cast Iron Pan Pizza with Thick Crust

There’s something unbeatable about a thick-crust pizza baked in a hot cast iron skillet: the pan creates an evenly browned, crisp bottom while the dough stays soft and airy inside. This recipe leans into that contrast, using a slightly wetter dough and a very hot, well-preheated skillet to create a deep, tender crust with a golden, crackly edge.

What makes this method special is the cast iron’s ability to hold and radiate intense heat. Starting the pizza in a screaming-hot skillet jumpstarts oven spring and creates a crunchy base, and finishing under high oven heat (or briefly under the broiler) gives the cheese that irresistible blister. The technique is forgiving, adaptable to any toppings, and works with simple kitchen equipment you may already own.

Why this recipe works

Two things drive the results: dough hydration and pan temperature. A slightly wetter dough develops more open crumb (bubbles and chew) without weighing down the crust, while an intensely heated cast iron skillet produces a caramelized crust that traps steam inside the dough. The result is a thick, airy interior and a crisp base—close to a deep-dish texture but without a heavy, bready feel.

Choosing the right equipment

Your most important tool is the cast iron skillet. For a home oven, a 10–12 inch seasoned cast iron skillet is ideal: it’s large enough to make a shareable pizza and small enough to handle easily. Look for a heavy, pre-seasoned pan with a comfortable handle and a flat base to ensure even contact with the oven rack. If you don’t own one yet, consider a well-reviewed option such as the popular Lodge cast iron models (browse Lodge Cast Iron Skillets on Amazon).

Other helpful tools include a bench scraper for handling dough, a thin metal spatula to loosen the pizza after baking, and an oven thermometer so you can confirm high heat. A basic pizza peel is useful if you want to transfer pizzas in and out of larger ovens (pizza peels on Amazon). For more cookware perspectives and how to choose the best pan for your kitchen, see HomeCookPicks’ buying coverage like our Best Cookware Deals: Top Value Picks Across Every Category and the Best Eco-Friendly Cookware: PFAS-Free and Sustainable Options.

What to expect

This recipe yields a single 10–12 inch thick-crust pizza that serves about 3–4 people. The process includes a short active prep, a single proof to develop flavor and structure, and a high-temperature bake that finishes with blistered cheese. The technique is adaptable—use it as a template for vegetarian, meat, or white pizzas.

Tips and variations

  • For a crisper bottom, preheat the skillet in the oven for at least 30 minutes at the highest temperature your oven allows; the hotter the pan, the better the crust.
  • Use room-temperature toppings and avoid over-saucing; excess moisture will make the crust soggy. A thin layer of sauce and properly drained vegetables keep the center from becoming heavy.
  • Try brushing the skillet with olive oil and sprinkling a light dusting of cornmeal or semolina to create extra crunch and prevent sticking.
  • For a richer crust flavor, substitute up to 25% of the all-purpose flour with bread flour or add one tablespoon of honey to the dough for subtle sweetness and better browning.

Safety and workflow notes

Cast iron retains heat—handles get extremely hot. Always use a heavy oven mitt or handle cover when moving the skillet. Let the pan cool slightly before cleaning; avoid sudden temperature changes to preserve seasoning. If you want scratch-resistance or a nonstick alternative to cast iron, see HomeCookPicks’ guide to the Best Scratch-Resistant Pans for choices that pair well with metal utensils and frequent use.

Storage and reheating

Homemade pizza stores well. Cool completely, wrap tightly in plastic wrap or place in an airtight container, and refrigerate for up to 3 days. For longer storage, freeze individual slices on a sheet pan, then transfer to a freezer bag for up to 2 months. Reheat in a 375°F oven on a sheet pan or in a skillet over medium heat until warmed through to preserve crust texture.

Ready to make it?

Gather your ingredients, preheat your oven and skillet, and follow the dough directions in the recipe meta to create a thick, satisfying cast iron pan pizza. The technique rewards attention to temperature more than complicated steps—master heat control and you’ll get reliably great results.

Recommended extras: a bench scraper simplifies dough handling (bench scrapers on Amazon), and a pizza peel helps if you bake multiple pies. Enjoy building your own signature pan pizza!
Instructions

1

Activate the yeast and mix the dough

In a medium bowl, combine warm water and sugar; sprinkle the yeast over the surface and let sit 5–7 minutes until foamy. Stir in olive oil, then add flour and salt. Mix until a shaggy dough forms, then turn onto a lightly floured surface and knead 5–7 minutes until smooth and slightly tacky. Alternatively, mix in a stand mixer with a dough hook for 4–5 minutes.

💡 Pro tip: If the dough feels dry, add water a teaspoon at a time; if very sticky, dust with a bit more flour—aim for a tacky but workable dough.
2

First rise

Place the dough in a lightly oiled bowl, cover tightly with plastic wrap or a damp towel, and let rise at room temperature for 45–60 minutes, or until roughly doubled in size.

💡 Pro tip: Faster rise in a warm spot (like an oven with the light on); for more flavor, refrigerate overnight and bring back to room temperature before proceeding.
3

Preheat oven and skillet

About 30 minutes before baking, place a clean 10–12 inch cast iron skillet on the middle rack and preheat the oven to 500°F (or the highest your oven allows). Allow the skillet to heat at temperature for at least 20–30 minutes so it becomes very hot.

💡 Pro tip: Use an oven thermometer to confirm temperature; a screaming-hot pan is key to a crisp base.
4

Shape the dough and prepare the skillet

Gently deflate the dough and shape into a rough disk. Carefully remove the hot skillet from the oven using heavy mitts and brush the bottom and sides with 1–2 teaspoons of olive oil. If desired, sprinkle a thin layer of cornmeal or semolina to prevent sticking. Press the dough into the skillet from the center outward to form an even layer with thicker edges for the rim.

💡 Pro tip: Work confidently but quickly when handling the hot skillet; don’t touch the pan with bare hands.
5

Assemble the pizza

Spread a thin layer of sauce over the dough, leaving a small border. Add shredded mozzarella and other toppings in moderation—the goal is a thick crust, not an overloaded pie. Finish with grated Parmesan and a sprinkle of dried oregano.

💡 Pro tip: Avoid wet toppings straight from the fridge; bring roasted vegetables to room temperature and pat dry if needed.
6

Bake and finish

Return the skillet to the oven and bake for 12–18 minutes until the crust is golden and the cheese is melted and bubbly. For additional char on the cheese, switch the oven to broil for 1–2 minutes while watching closely to avoid burning. Remove skillet and let the pizza rest 3–5 minutes before slicing to allow the interior to set.

💡 Pro tip: If the crust browns too quickly, move the pan to a lower rack and reduce temperature slightly; every oven behaves differently.
7

Slice and serve

Use a sharp pizza cutter or a sturdy spatula to loosen the edges and transfer slices to plates. Let each slice rest a minute—this makes the cheese easier to handle and improves flavor.

💡 Pro tip: If the pizza sticks slightly, slide a thin metal spatula around the edge before lifting.

More to Cook

You Might Also Like

Hearty Beef and Vegetable Stew

A comforting, slow-braised beef and vegetable stew perfect for weeknights or weekend gatherings — rich, savory, and easy to make in a Dutch oven or slow cooker. This recipe focuses on deep flavor from browning, aromatics, and long, gentle simmering.

View Recipe →

Stay in the loop

Get the Best Kitchen Picks Delivered

New buying guides, honest reviews, and kitchen-tested recipes — straight to your inbox. No spam, ever.