Homemade Almond Milk
Homemade almond milk is one of the simplest, most rewarding staples you can make in your kitchen. With just a handful of ingredients and a good blender, you can create a fresh, creamy dairy-free milk that’s free of additives, preservatives, and the thinned-out taste of many store-bought brands. This recipe focuses on bright, natural flavor and an easy technique that doesn’t require any special skills.
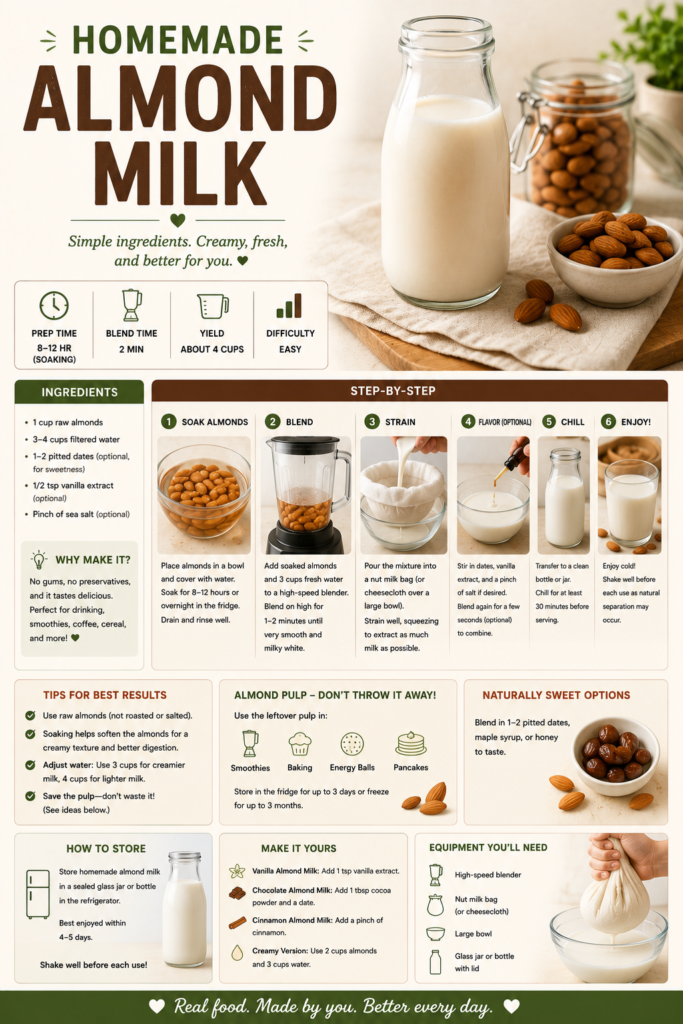
Why this method works: soaking softens the almonds so they blend ultra-smooth, while a high-speed blender extracts flavor and fats efficiently so the texture is rich without being gritty. Straining with a fine nut milk bag or cheesecloth produces a silky liquid; the leftover almond pulp can be repurposed in cookies, granola, or smoothies so nothing goes to waste.
What makes this almond milk special
This recipe balances a pleasantly almond-forward taste with a light sweetness (optional), and keeps the ingredient list short so the natural almond flavor shines. You can make it thicker or thinner simply by changing the water ratio, and you control the sweetener and salt for better flavor than most commercial options. It’s also fully customizable—add vanilla, a date, a pinch of salt, or try cacao for a chocolate version.
Choosing the right equipment
The single most important tool for homemade almond milk is a powerful blender. A high-speed blender will extract more of the almond’s natural oils and flavor, producing a creamier milk with less grit. If you already own a countertop blender that can handle soft nuts and ice well, you’re set. If you’re shopping, check our guide to Best Blenders for Smoothies to compare options that excel at nut milks and smoothies.
For straining, a dedicated nut milk bag gives the best results—finer than kitchen strainers and reusable. We also recommend a set of glass storage bottles for keeping your milk fresh in the fridge.
Shop recommended gear:
Vitamix blender (excellent for nut milks),
nut milk bag,
glass storage bottles.
If you’re trying to decide between popular blender brands, our head-to-head guide Vitamix vs Ninja: Which Blender Brand Should You Buy? breaks down power, durability, and performance so you can choose the right model for homemade nut milks and more.
Why the hands-on approach is worth it
Making almond milk at home means you control texture, sweetness, and additives. Commercial almond milks are often diluted, thickened with gums, and sweetened—homemade milk can be dairy-free and whole-foods based while still being creamy. The recipe here gives you the baseline: a clean, neutral almond milk you can use anywhere from cereal to baking or as the base for smoothies.
What you’ll learn from this guide
- How to choose almond-to-water ratios for desired thickness
- Why soaking improves flavor and texture
- Tools and techniques for a consistently smooth result
- Creative ways to use leftover almond pulp
Tips & variations
Use these quick tips to get the best results and to experiment confidently with flavor and texture.
Tip 1: Soak the almonds at least 8 hours or overnight. Longer soaking (up to 24 hours) reduces bitterness and makes them easier to blend. If you’re short on time, soak in very hot water for 1 hour as a quick option.
Tip 2: Strain carefully. A nut milk bag pressed gently will produce creamy milk without forcing pulp through the mesh. If your milk seems gritty, re-strain through a finer cloth.
Tip 3: Save and use the almond pulp. Dry it in a low oven or use it straight into baked goods, smoothies, or energy balls to avoid waste.
Tip 4: Adjust sweetness and salt to taste. A small pinch of fine sea salt brightens the flavor; a single Medjool date or a teaspoon of maple syrup provides subtle sweetness without overpowering the almond flavor.
Final notes
Once you’ve made almond milk a few times you’ll find your preferred ratio and flavorings. Whether you keep it simple for coffee or jazz it up for cereal and baking, homemade almond milk is economical, fresh, and delicious. With the right blender and a simple nut milk bag, it becomes faster than a trip to the store—plus it tastes better.
For more on picking the perfect blender to make this and other recipes, see our Best Blenders for Smoothies guide or compare top brands in our Vitamix vs Ninja article.
Happy blending!