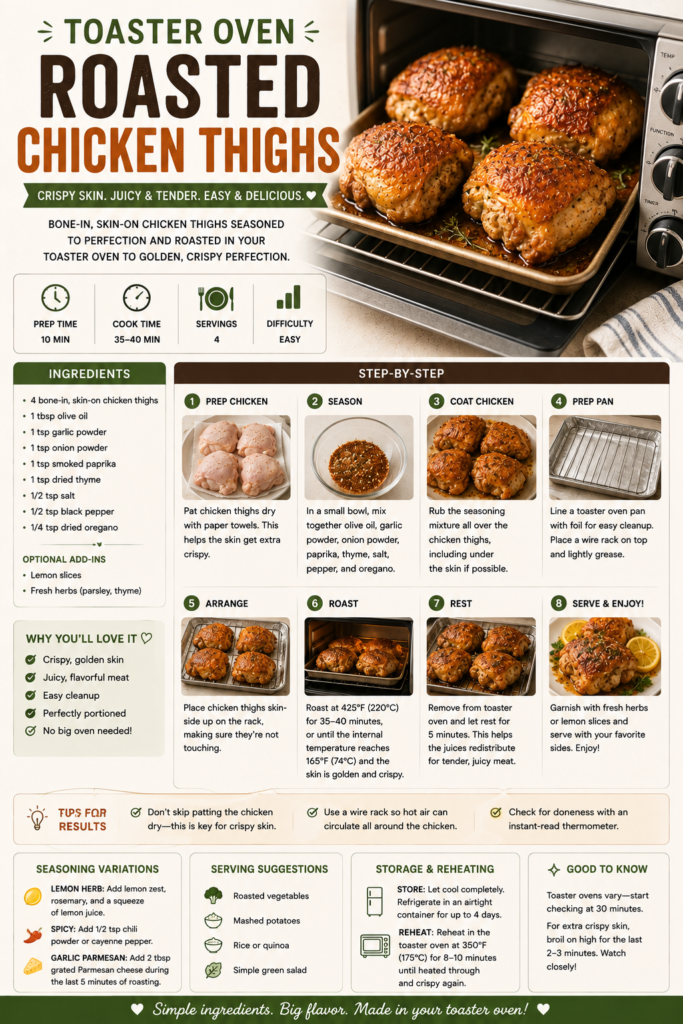
Toaster Oven Roasted Chicken Thighs

Crispy, juicy roasted chicken thighs made in your air fryer/toaster oven—perfect weeknight protein with minimal fuss. This foolproof method yields golden skin and tender meat every time.

15 min Prep Time
35 min Cook Time
50 min Total Time
4 Servings
Easy Difficulty

Ingredients

Servings:
4
Nutrition (per serving)
Calories 420 kcal
Protein 30g
Fat 32g
Carbohydrates 2g
Fiber 0g
💾 Storage

Refrigerate cooked chicken thighs in an airtight container for up to 3–4 days. Reheat in a toaster oven or conventional oven at 350°F until warmed through to preserve crispness (about 8–12 minutes); avoid microwaving when possible to prevent soggy skin. For longer storage, freeze cooked thighs in a freezer-safe container or heavy-duty bag for up to 2 months—thaw overnight in the refrigerator before reheating.

🍳

Best Made With: Air Fryer / Toaster Oven

Choose a toaster oven with convection/air-fry mode and enough interior space to arrange thighs in a single layer for even browning.

See Our Top Air Fryer / Toaster Oven Picks →

Toaster Oven Roasted Chicken Thighs

There are few weeknight dinners as reliable and satisfying as roasted chicken thighs. Using a toaster oven or air fryer-style toaster oven concentrates heat around each piece, producing a blistered, golden skin and succulent meat without heating your whole kitchen. This recipe leans on a simple dry-rub plus a small amount of baking powder to help the skin crisp quickly—no frying, no fuss.

What makes this recipe special is the balance between convenience and result. Bone-in, skin-on thighs are forgiving during cooking; they stay moist under high heat and are easy to portion for families. The toaster oven’s compact cavity and convection or air-fry setting speed up browning, giving you restaurant-style texture in a fraction of the time. Whether you have a dedicated air fryer or a combo toaster oven with an air-fry function, you’ll get consistent, impressive results.

Why this method works

The key to crisp skin is twofold: remove as much surface moisture as possible, and expose the skin to hot, dry circulating air. A light dusting of baking powder (not baking soda) helps dry and roughen the skin surface at a microscopic level so the heat can render fat and create crispness. Meanwhile, the compact heating environment of a toaster oven concentrates convection and radiant heat, accelerating Maillard browning without overcooking the meat. That means a crispy exterior and a juicy interior in under 40 minutes.

Choosing the right equipment

Not all toaster ovens are created equal. For best results pick a model with a convection or air-fry mode and enough interior room to fit the thighs in a single layer without overcrowding. If you’re choosing a new appliance, check our in-depth guide to find models that balance capacity, heating performance, and easy cleanup: Best Air Fryers for Home Cooks: Tested and Ranked.

If you already narrowed it down to popular options, our brand comparison write-up helps decide between top contenders like Ninja and Cosori: Ninja vs Cosori Air Fryers: Which Brand Should You Buy?

Helpful tools for this recipe include a rimmed baking sheet or an air-fryer compatible rack, and an instant-read thermometer to check doneness. If you need quick options, here are three product searches on Amazon to explore:

Pro tip: A medium-size toaster oven with a removable crumb tray makes cleanup easier, and a small wire rack lets hot air circulate under the thighs so the underside crisps as well.

What to serve with these thighs

Roasted chicken thighs are extremely versatile. For a quick weeknight plate, pair them with a simple green salad, roasted vegetables, or a scoop of herby rice. For a heartier meal, serve alongside mashed potatoes or creamy polenta. The lemon and garlic notes in the rub play nicely with bright sides like a fresh tomato salad or lemony couscous.

Tips and variations

  • Brine or no brine: A short brine (30 minutes to 2 hours) can add juiciness, but it’s optional. If you brine, reduce the added salt in the rub.
  • Spice variations: Swap smoked paprika for chili powder for a southwest vibe, or add a teaspoon of curry powder for an Indian-inspired twist.
  • Skinless option: If you prefer skinless thighs, reduce baking powder and roast at a slightly lower temperature (375°F) to prevent drying.
  • Make-ahead: Dry-rub the thighs and refrigerate them uncovered for a few hours or overnight to intensify flavor and improve crisping.

This recipe is ideal for home cooks who want a dependable, low-fuss protein that scales easily. The entire process uses minimal equipment and straightforward pantry spices, and the results are reliably delicious—crispy skin, juicy meat, and balanced seasoning. Scroll down to the ingredient list and step-by-step instructions to get cooking.

Happy cooking—and if you’re equipment shopping, remember to consult our product guides linked above to choose the best air fryer or toaster oven for your kitchen and needs.
Instructions

1

Preheat and prepare the pan

Position the rack in the toaster oven so there's enough room above the thighs for air circulation. Preheat to 400°F (200°C) on convection or air-fry mode. Line a rimmed baking sheet with foil for easy cleanup; if you have a small wire rack that fits, place it on the sheet to elevate the thighs.

💡 Pro tip: Elevating the thighs on a rack helps the underside get crispy as hot air circulates.
2

Dry the chicken and apply baking powder

Pat the chicken thighs thoroughly dry with paper towels—dry skin equals crispier results. In a small bowl, combine the baking powder, salt, pepper, smoked paprika, garlic powder, onion powder, and thyme. Sprinkle the dry mix evenly over the skin side, then rub the oil all over each thigh to help the seasoning adhere.

💡 Pro tip: Use aluminum-free baking powder to avoid off flavors; it helps speed browning and improve texture.
3

Season under the skin (optional)

If you like deeper flavor, gently loosen the skin around the meat with your fingers and rub a little of the seasoning mixture and a squeeze of lemon juice between skin and meat. This step is optional but increases flavor directly at the meat surface.

💡 Pro tip: Take care not to tear the skin—work gently and distribute the seasoning evenly.
4

Arrange thighs for even cooking

Place the thighs skin-side up in a single layer on the rack or sheet, making sure pieces don’t touch. Overcrowding reduces air flow and prevents proper crisping. If necessary, cook in batches so each piece gets direct exposure to hot air.

💡 Pro tip: Leave a bit of space between pieces—about 1/2 inch—so air can circulate.
5

Roast until crispy and cooked through

Slide the tray into the preheated toaster oven and roast for 25–35 minutes. Check after 20 minutes—if the skin is browning too quickly, reduce the temperature to 375°F. The thighs are done when an instant-read thermometer inserted into the thickest part (not touching bone) reads 165°F–170°F and the juices run clear.

💡 Pro tip: Because toaster ovens vary, rely on internal temperature rather than time alone for the best results.
6

Rest and finish

Remove the thighs from the oven and let them rest for 5–10 minutes to redistribute juices. Finish with a zest of lemon and a sprinkle of chopped parsley, then serve hot.

💡 Pro tip: Resting makes a noticeable difference—don’t skip it. The lemon zest brightens the rich flavors without overpowering them.

More to Cook

You Might Also Like

Stand Mixer Brioche Bread

Learn how to make rich, buttery brioche using a stand mixer and your oven — a foolproof method for soft, tender loaves that slice beautifully. This recipe fits both weekday breakfasts and weekend baking projects with clear steps, tips, and variations.

View Recipe →

Julienne Carrots for Stir Fry

Learn to julienne carrots precisely and quickly for stir fries, salads, and garnishes. This guide teaches the prep technique, the right tools (including choosing a chef's knife), step-by-step cutting instructions, tips, and storage.

View Recipe →

Hearty Beef and Vegetable Stew

A comforting, slow-braised beef and vegetable stew perfect for weeknights or weekend gatherings — rich, savory, and easy to make in a Dutch oven or slow cooker. This recipe focuses on deep flavor from browning, aromatics, and long, gentle simmering.

View Recipe →

Stay in the loop

Get the Best Kitchen Picks Delivered

New buying guides, honest reviews, and kitchen-tested recipes — straight to your inbox. No spam, ever.