Stand Mixer Brioche Bread

Learn how to make rich, buttery brioche using a stand mixer and your oven — a foolproof method for soft, tender loaves that slice beautifully. This recipe fits both weekday breakfasts and weekend baking projects with clear steps, tips, and variations.

45 min Prep Time
35 min Cook Time
80 min Total Time
12 Servings
Medium Difficulty

Ingredients

Servings:
12
Nutrition (per serving)
Calories 325 kcal
Protein 6 g
Fat 17 g
Carbohydrates 36 g
Fiber 1 g
💾 Storage

Cool completely, then wrap the loaf tightly in plastic wrap or place in an airtight container. Store at room temperature for up to 2 days. For longer keeping, refrigerate up to 5 days (reheat slices briefly in the toaster or oven to refresh). For long-term storage, slice and freeze in a resealable bag for up to 3 months; toast or warm frozen slices directly for best results.

🍳

Best Made With: Stand Mixer

Choose a stand mixer with a powerful motor (at least 250–300W) and a dedicated dough hook for consistent results with enriched doughs like brioche.

See Our Top Stand Mixer Picks →

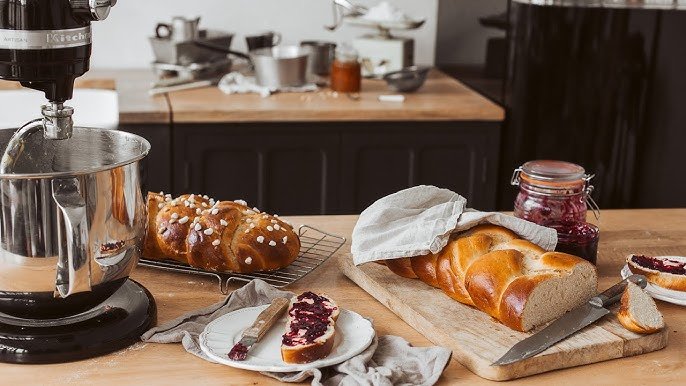
Stand Mixer Brioche Bread

Brioche is the gold standard of enriched breads: tender crumb, buttery flavor, and a soft, slightly sweet profile that makes it perfect for breakfast toasts, French toast, or a luxurious sandwich. Using a stand mixer takes the heavy lifting out of the equation — the dough hook replicates long, patient kneading so you get that glossy, elastic dough without wringing your wrists.

This stand mixer brioche recipe balances convenience and authenticity. It uses instant yeast and a straightforward mixing/kneading sequence so you can finish shaping and put the loaf in the oven within a few hours, or cold-proof overnight if you prefer a deeper flavor and more flexible schedule. The result is a loaf with an open yet fine crumb, a golden crust, and that unmistakable buttery aroma.

Why this method works

Brioche relies on two key techniques: thorough gluten development and gradual incorporation of large amounts of butter. The stand mixer provides consistent kneading to develop a strong, elastic gluten network that traps air and supports the fat-rich dough. Adding softened butter in small batches while the mixer runs allows the fat to emulsify into the dough instead of separating, producing a cohesive, silky texture.

Proofing twice (first bulk rise, then shaping and final rise) gives the yeast time to build structure and flavor, while an optional overnight cold retard enhances complexity and makes scheduling flexible. Because the method minimizes manual kneading, it’s ideal for bakers who want artisanal results without specialized training.

Choosing the right equipment

For this recipe you need a reliable stand mixer with a dough hook and a good oven. If you’re shopping for a mixer, both higher-capacity models and reputable mid-range units will produce excellent brioche — what matters most is a powerful motor and a sturdy dough hook. For a quick comparison to help you choose, see our KitchenAid vs Cuisinart Stand Mixers guide.

Helpful tools and recommended items (affiliate links):

If you’re new to baking sets, our Best Baking Sets for Beginners guide has a curated list of starter kits that pair well with this recipe.

What you’ll love about this loaf

  • Versatile: slice for sandwiches, toast, or use for French toast and bread pudding.
  • Reliable: the stand mixer ensures consistent gluten development and butter incorporation.
  • Schedule-friendly: can be made same day or retarded overnight for convenience and flavor.

Tips & Variations

  • For a richer brioche, replace 1–2 tablespoons of milk with heavy cream, or brush the finished loaf with melted butter right after it comes out of the oven for an extra-soft crust.
  • To make brioche buns, divide the dough into 10–12 equal pieces and proof in greased muffin tins instead of a loaf pan; bake at the same temperature but for a shorter time (about 18–22 minutes).
  • If you want deeper flavor and a more manageable schedule, shape the loaf, place it in the greased pan, then cover and refrigerate overnight for a slow final rise; bring to room temperature and bake the next morning.
  • Keep an eye on internal temperature when baking enriched breads — a finished brioche registers around 190°F (88°C) in the center when fully baked without over-browning the top.

Serving suggestions

Serve slightly warm with butter and jam, use thick slices for French toast, or make an upscale grilled cheese. Brioche also makes excellent hamburger buns; lightly toast sliced rounds before assembling.

With the right tools and a little patience, this stand mixer brioche becomes a repeatable favorite in your baking rotation. Scroll down to the ingredients and step-by-step instructions to get started.

Instructions

1

Combine dry ingredients

In the stand mixer bowl combine the bread flour, granulated sugar, and instant yeast. Add the salt on the opposite side of the bowl (salt can inhibit yeast if it contacts it directly). Attach the dough hook.

💡 Pro tip: If using active dry yeast, proof it in the warm milk with a pinch of sugar for 5–10 minutes first; reduce flour slightly if adding extra liquid.
2

Add eggs and milk, mix to form dough

Add the three eggs and the warm milk to the bowl. Start the mixer on low speed until the mixture forms a shaggy dough and the flour is hydrated (about 1–2 minutes). Increase to medium speed and continue mixing until the dough begins to come together, about 3–4 minutes.

💡 Pro tip: If the dough looks excessively dry, add up to 1 tablespoon of warm milk at a time; the dough should be tacky but not overly wet.
3

Knead and incorporate butter

With the mixer running on medium, add the softened butter cubes gradually — a few pieces at a time — allowing each addition to incorporate before adding more. This can take 8–12 minutes total. Keep mixing until the butter is fully absorbed and the dough is smooth, glossy, and forms a soft, elastic ball that pulls away from the bowl.

💡 Pro tip: Don’t rush the butter addition; patience ensures the fat emulsifies rather than separating, giving a cohesive dough and even crumb.
4

First rise (bulk fermentation)

Lightly oil a large bowl, transfer the dough to the bowl, and turn it to coat in oil. Cover with plastic wrap or a damp towel and leave in a warm, draft-free spot until doubled in size, about 1 to 1 1/2 hours.

💡 Pro tip: For a richer flavor and flexible timing, refrigerate the covered dough for 8–12 hours; bring back to room temperature before shaping.
5

Shape and final proof

Gently deflate the dough on a lightly floured surface. Shape into a loaf by rolling and tucking into a tight cylinder and place seam-side down in a greased 9x5-inch loaf pan. Alternatively, divide into buns and place in greased muffin tins. Cover and let rise until the dough puffs to about 75–90% of the final size (roughly 45–60 minutes).

💡 Pro tip: If the dough is very warm after proofing, refrigerate for 15–20 minutes to make shaping easier and prevent it from overproofing quickly.
6

Preheat, egg wash, and bake

Preheat the oven to 350°F (175°C). Whisk the remaining egg with 1 tablespoon milk and gently brush the top of the loaf. Bake in the preheated oven for 30–35 minutes, or until the crust is deep golden and the center reaches about 190°F (88°C). If the top browns too quickly, tent loosely with foil for the last 10–15 minutes.

💡 Pro tip: An instant-read thermometer is the most reliable way to check doneness in enriched breads.
7

Cool and finish

Remove the loaf from the oven and, if desired, brush the top with melted butter for a soft, shiny crust. Let the loaf cool in the pan for 10 minutes, then transfer to a wire rack to cool completely before slicing (at least 1 hour).

💡 Pro tip: Slicing too soon will compress the crumb and make the texture gummy; patience yields the best slices.

More to Cook

You Might Also Like

Ultimate Green Smoothie

A green smoothie that actually tastes great — tropical fruit flavor with 2 cups of spinach hidden inside. The liquid-first blending technique ensures a perfectly smooth result every time.

View Recipe →

Julienne Carrots for Stir Fry

Learn to julienne carrots precisely and quickly for stir fries, salads, and garnishes. This guide teaches the prep technique, the right tools (including choosing a chef's knife), step-by-step cutting instructions, tips, and storage.

View Recipe →

Stay in the loop

Get the Best Kitchen Picks Delivered

New buying guides, honest reviews, and kitchen-tested recipes — straight to your inbox. No spam, ever.