Homemade Peanut Butter (Blender Method)
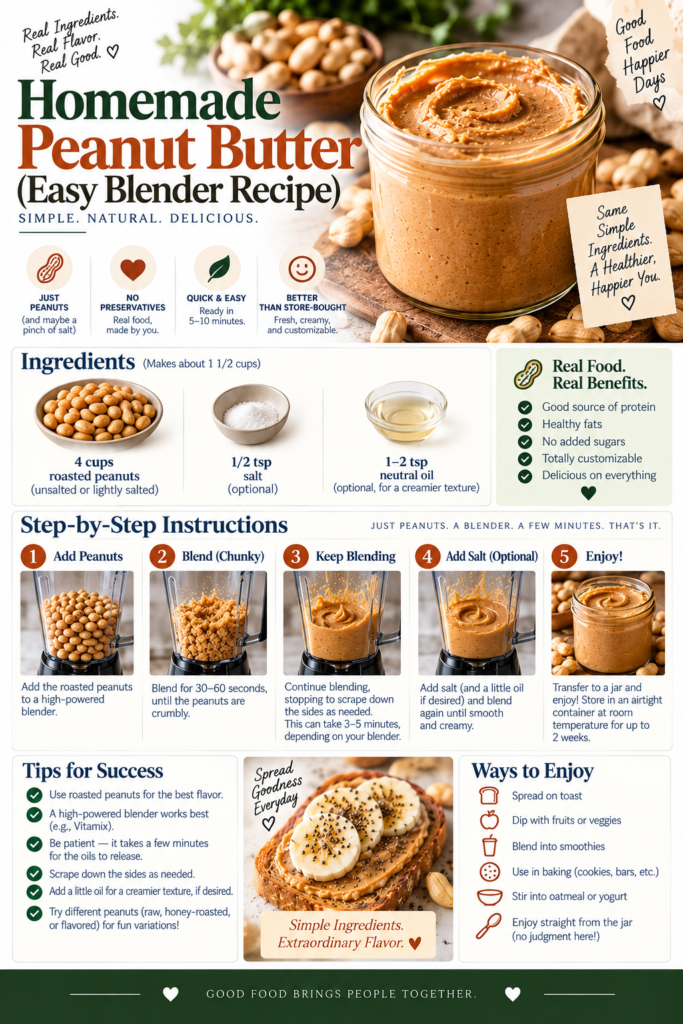
Making peanut butter at home is one of those small kitchen victories that tastes far better than you expect. With only a few ingredients and a high-speed blender, you control the texture, sweetness, and saltiness. Freshly blended peanut butter has a brighter nutty flavor and creamier mouthfeel than many commercial jars because it doesn’t contain preservatives or unnecessary stabilizers.
This recipe focuses on simplicity and technique. You’ll learn how to coax a smooth, spreadable butter from roasted peanuts using short bursts of blending and a little oil to achieve the consistency you prefer. It scales easily and is a great base for flavored variations like honey peanut butter, cinnamon, or spicy peanut butter for sauces.
Why this recipe works
The magic of homemade peanut butter comes down to two things: heat and patience. As the peanuts break down in the blender, friction generates heat that helps release natural oils. Short processing bursts and frequent scraping prevent overheating while ensuring even grinding. Adding a small amount of neutral oil at the right stage smooths the mixture without overpowering the natural peanut flavor.
Using a blender (rather than a food processor) is perfectly suitable for small to medium batches and gives you a quick, accessible way to make peanut butter in minutes. If you have a high-powered blender, the process is even faster and produces an ultra-smooth texture. For guidance on choosing the right blender for this and many other kitchen tasks, see our buying guide comparisons below.
Choosing the right equipment
Because this recipe is built around a blender, picking an appliance with enough power and a stable container is important. High-powered blenders make smoother peanut butter more quickly and tolerate longer run times without overheating. If you already own a sturdy blender, you can use it for this recipe; if you’re shopping for one, consider models tested for nut butters and thick blends.
Here are a few product search links to help you find suitable equipment on Amazon:
- Vitamix 5200 (search)
- Ninja Professional Blender (search)
- Silicone spatula (search)
Not sure which blender brand fits your needs? Our guide Vitamix vs Ninja: Which Blender Brand Should You Buy? compares power, durability, and value to help you decide. You can also browse our Best Blenders for Smoothies guide for high-performance models that handle nut butters well.
What to expect
Start with roasted peanuts; raw peanuts require roasting first. As you blend, the nuts will pass through stages: crumbly, sandy, clumping into a dry mass, then finally releasing oils and turning into a glossy butter. The time this takes depends on the blender’s power and how much you’re making. Plan for 5–12 minutes of cumulative blending time, with pauses to scrape and cool.
Texture is entirely customizable. For crunchy peanut butter, reserve 1/3 cup of coarsely chopped peanuts to fold in at the end. For natural-style peanut butter with oil separation, skip stabilizers and simply stir before serving. If you like a sweeter spread, add a little honey or sugar; for savory uses or sauces, try a pinch of garlic powder or chili flakes.
Troubleshooting
If your blender struggles, try smaller batches to reduce strain. Overheating will cause the motor to slow or shut off; work in short bursts and allow the blender to rest if it gets hot. If the mixture never smooths, add 1 teaspoon of neutral oil at a time until the blades can move the mixture freely—this improves lubrication and helps the peanuts reach a silky stage.
Be mindful of the jar shape and blade design. Narrow tall jars can create a vortex that keeps solids centered and away from the blades; a wider jar helps the blades contact more nuts. For persistent chunkiness, pulse and shake the jar between blends to redistribute contents.
Tips and variations
- For extra flavor, toast raw peanuts in a 350°F oven for 8–10 minutes until fragrant, then cool before blending.
- Make it crunchy by folding in chopped roasted peanuts after blending to your desired texture.
- Flavor variations: stir in 1–2 tablespoons honey or maple syrup for sweetness, a pinch of cinnamon for warmth, or 1/2 teaspoon smoked paprika for a savory twist.
- To reduce oil separation, blend a teaspoon of powdered lecithin or add a small amount of powdered milk; alternatively store refrigerated and stir before use.
Safety and cleanup
Always allow the blender motor to rest if it becomes hot. Unplug before removing the jar or blades for cleaning. Clean the jar and lid promptly after use—warm soapy water and a soft brush remove sticky oils; some jars are dishwasher-safe, but check the manufacturer’s instructions. A silicone spatula helps scrape every last bit of peanut butter from the jar.
Making peanut butter at home is empowering and endlessly adaptable. Once you master the basic method, feel free to experiment with different nuts, seeds, or sweeteners. Enjoy your fresh, preservative-free peanut butter on toast, in baking, or as a base for sauces and smoothies.
If you’re shopping for a new blender to make nut butters and more, check our comparisons: Vitamix vs Ninja and our Best Blenders for Smoothies guide to find a model that suits your kitchen.