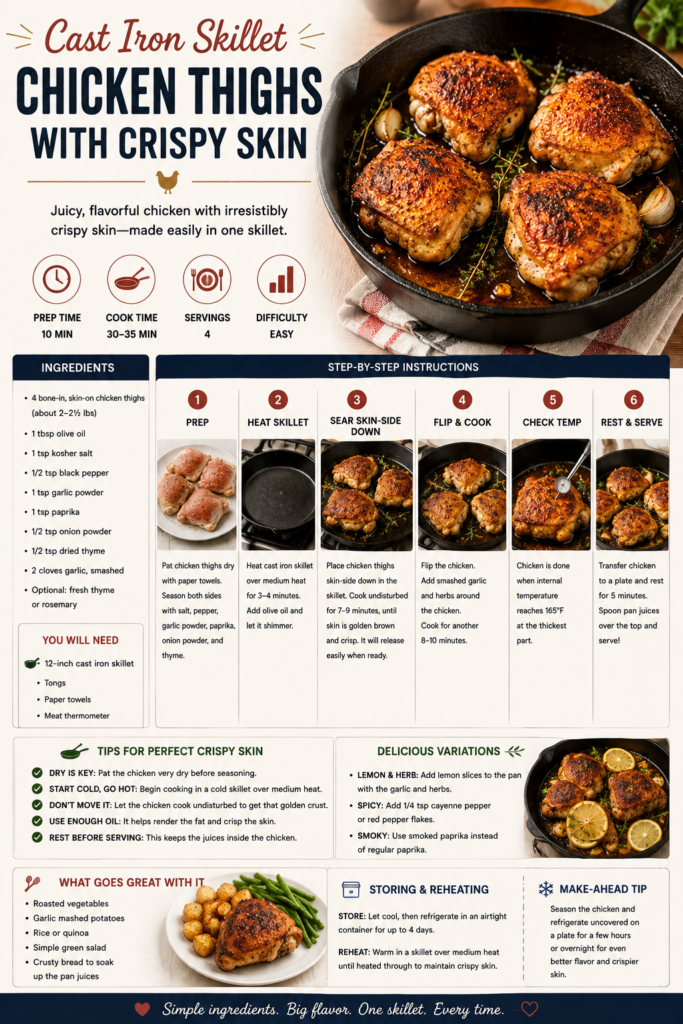
Cast Iron Skillet Chicken Thighs with Crispy Skin

A simple, reliable method for bone-in, skin-on chicken thighs that delivers ultra-crispy skin and juicy meat using a hot cast iron skillet and a quick oven finish. Perfect weeknight dinner or entertaining main with minimal fuss.

15 min Prep Time
30 min Cook Time
45 min Total Time
4 Servings
Easy Difficulty

Ingredients

Servings:
4
Nutrition (per serving)
Calories 520 kcal
Protein 36g
Fat 40g
Carbohydrates 2g
Fiber 0g
💾 Storage

Store cooled chicken thighs in an airtight container in the refrigerator for up to 3 days. To reheat and preserve crispiness, warm in a 400°F (200°C) oven for 8–10 minutes until heated through and skin re-crisped; alternatively, reheat in a skillet over medium heat. For longer storage, freeze in a freezer-safe container for up to 2 months and thaw overnight in the refrigerator before reheating.

🍳

Best Made With: Cast Iron Skillet

Choose a 10–12 inch pre-seasoned cast iron skillet with a comfortable handle and even weight distribution so it heats evenly and fits in your oven.

See Our Top Cast Iron Skillet Picks →

Cast Iron Skillet Chicken Thighs with Crispy Skin

There’s something deeply satisfying about a skillet-roasted chicken thigh: golden, crackly skin and tender, juicy meat beneath. This recipe uses the classic hot-pan-then-oven technique that produces reliably crisp skin while keeping the inside succulent. A properly preheated cast iron skillet and a short roast in a hot oven are the keys.

What makes this approach special is its simplicity. Minimal seasoning lets the chicken’s flavor shine, while a combination of high heat, rendered fat, and a brief basting with butter and aromatics creates concentrated flavor and that irresistible crunchy skin. You’ll learn how to assess doneness without overcooking and get tips to adapt the flavors for herbs, spice blends, or citrus finishes.

Why this recipe works

Two elements ensure success: moisture management and controlled heat. Patting the skin dry and salting it early draws surface moisture, which is essential for crisping. Searing skin-side down in a preheated cast iron skillet renders fat and browns the skin with direct contact. Finishing in a hot oven cooks the meat evenly through without burning the exterior.

Cast iron is ideal because it retains heat and distributes it evenly; once the pan is hot, it gives a consistent sear. If you don’t already own a heavy skillet, investing in a quality cast iron pan will serve you for countless dishes beyond chicken—from cornbread to pan-roasted vegetables.

Choosing the right equipment

A 10- to 12-inch cast iron skillet is the perfect tool for this recipe: large enough to hold 4–6 chicken thighs without crowding, and heavy enough to maintain steady heat. If you’re shopping for a skillet, the classic Lodge cast iron skillet is a durable, budget-friendly option that many home cooks trust: Lodge Cast Iron Skillet on Amazon. For checking doneness, an instant-read thermometer is indispensable—this model is a handy choice: ThermoPro Instant-Read Thermometer on Amazon.

If you want to explore cookware options before buying, check our roundup of top picks for great value and quality in cookware: Best Cookware Deals: Top Value Picks Across Every Category. For cooks prioritizing eco-friendly materials, our guide to sustainable, PFAS-free cookware is a helpful resource: Best Eco-Friendly Cookware: PFAS-Free and Sustainable Options.

What you’ll love about this method

  • Reliable crispy skin every time when you follow the dry-and-sear steps.
  • Minimal hands-on time: sear on the stovetop and finish in the oven.
  • Flexible flavor profile—works equally well with rosemary and lemon or a spicy dry rub.

Hands-off finishing and serving ideas

After the oven, a short 5-10 minute rest lets the juices redistribute for maximum juiciness. Serve the thighs over mashed potatoes, roasted vegetables, or a simple salad. Spoon pan juices (strain if desired) over the chicken for an extra hit of flavor.

Tips & variations

Tip 1: Pat the skin very dry and salt early (at least 15 minutes before cooking) to draw out surface moisture for the crispiest skin.

Tip 2: Don’t overcrowd the skillet—give each thigh room. If the pan is crowded, the pieces will steam instead of sear.

Tip 3: Use an instant-read thermometer to check for 165°F (74°C) internal temp at the thickest part; remove the chicken a few degrees early as it will continue to rise while resting.

Tip 4: For variation, swap the fresh herbs for smoked paprika and cumin for a warm, slightly smoky flavor, or add lemon slices to the pan in the last 5 minutes of roasting for a bright finish.

Care for your cast iron

After cooking, let the skillet cool slightly, then clean with hot water and a stiff brush—avoid harsh dish soap and soaking. Dry immediately and rub a thin layer of oil on the cooking surface to maintain seasoning. Properly cared-for cast iron lasts for generations and performs exceptionally well for high-heat applications like this recipe.

Ready to get started? Scroll down to the Ingredients and Step-by-Step Instructions sections for exact measurements and timing. Bon appétit!

Instructions

1

Prep and dry the chicken

Pat the chicken thighs dry very thoroughly with paper towels. Season both sides generously with salt and pepper, rubbing the salt into the skin and under the skin where possible. Let sit at room temperature for 15 minutes if time allows (or refrigerate up to 24 hours uncovered for even crisper skin).

💡 Pro tip: Dry skin is essential for crisping; salting early helps draw moisture out of the skin.
2

Preheat oven and skillet

Position a rack in the middle of the oven and preheat to 425°F (220°C). Place a 10–12-inch cast iron skillet in the oven while it preheats so the pan is hot when you add the chicken.

💡 Pro tip: A preheated skillet ensures immediate, even searing and helps render fat from the skin quickly.
3

Sear the chicken skin-side down

Carefully remove the hot skillet from the oven and place over medium-high heat on the stovetop. Add olive oil and swirl to coat. Arrange chicken thighs skin-side down in the pan, pressing gently so the skin makes full contact. Sear without moving for 8–10 minutes, until the skin is deeply golden and much of the fat has rendered.

💡 Pro tip: If the oil smokes excessively, reduce the heat slightly—hot but not blackening.
4

Add aromatics and flip

Flip each thigh so the skin-side is up. Nestle smashed garlic cloves and thyme/rosemary sprigs around the chicken. Add butter and tilt the pan to baste the tops of the thighs for about 30 seconds.

💡 Pro tip: Basting adds flavor and helps create an appealing glossy finish on the skin.
5

Roast in the oven

Transfer the skillet to the preheated oven and roast for 12–18 minutes, or until the thickest part of a thigh reaches 165°F (74°C) on an instant-read thermometer. Exact time depends on thigh size—smaller thighs may need less time.

💡 Pro tip: Insert the thermometer at an angle into the thickest part without touching bone for an accurate reading.
6

Rest and serve

Remove skillet from oven and transfer thighs to a cutting board. Tent loosely with foil and rest 5–10 minutes. Spoon pan juices over the chicken and serve with lemon halves for squeezing, mashed potatoes, or roasted vegetables.

💡 Pro tip: Resting lets the juices redistribute so the meat stays moist when you cut into it.

More to Cook

You Might Also Like

How to Butcher a Whole Chicken at Home

Learn how to break down a whole chicken into breasts, thighs, drumsticks, wings, and carcass with confident knife work and safe handling. This step-by-step guide includes equipment recommendations, pro tips, and storage advice so you can butcher at home cleanly and efficiently.

View Recipe →

Vacuum Sealed Marinated Steaks

Make restaurant-quality steaks at home by vacuum sealing them with a bold marinade for deep flavor and fast, even marinating. This method uses airtight food storage solutions so steaks are tender, juicy, and perfect for grilling or pan-searing.

View Recipe →

Stay in the loop

Get the Best Kitchen Picks Delivered

New buying guides, honest reviews, and kitchen-tested recipes — straight to your inbox. No spam, ever.