Dutch Oven Chicken and Dumplings

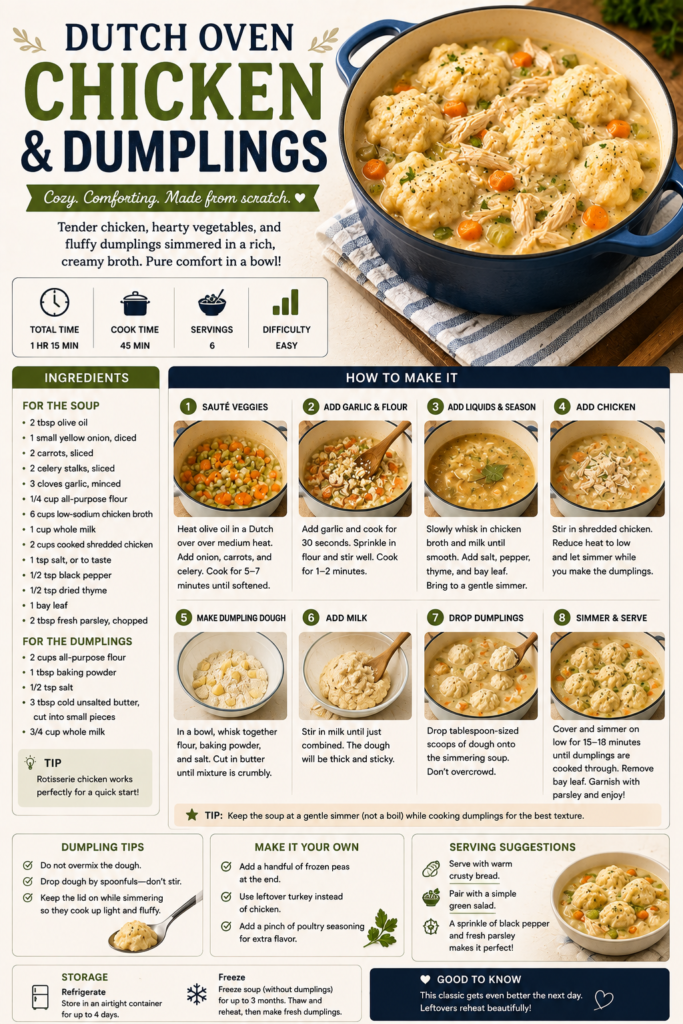
Comforting Dutch Oven Chicken and Dumplings — a one-pot dinner with tender braised chicken, silky gravy, and pillowy dumplings. Make this classic comfort food easily at home using a heavy Dutch oven for perfect heat retention.

20 min Prep Time
60 min Cook Time
80 min Total Time
6 Servings
Easy Difficulty

Ingredients

Servings:
6
Nutrition (per serving)
Calories 480 kcal
Protein 34g
Fat 20g
Carbohydrates 40g
Fiber 3g
💾 Storage

Cool leftovers to room temperature within 2 hours, then store in airtight containers in the refrigerator for up to 3–4 days. Reheat gently on the stove over low heat, adding a splash of chicken broth or milk to loosen the gravy. For longer storage, freeze in sealed containers for up to 3 months; thaw overnight in the refrigerator before reheating. Dumplings may absorb liquid when stored; add extra broth when reheating to restore texture.

🍳

Best Made With: Dutch Oven

Choose a 5–7 quart enameled or cast-iron Dutch oven for even heat distribution and a tight-fitting lid to steam the dumplings properly.

See Our Top Dutch Oven Picks →

Dutch Oven Chicken and Dumplings

This Dutch oven chicken and dumplings recipe is the kind of home-cooked meal that feels like a hug on a plate. Long-simmered chicken creates a rich, savory broth that becomes the base for a silky gravy, while tender, biscuit-like dumplings steam to fluffy perfection on top. Using a Dutch oven makes the whole process simpler: even heat distribution and a tight-fitting lid mean consistent simmering and reliably tender results.

What makes this version special is the balance of flavors and textures: caramelized aromatics and a browned sear on the chicken deepen the broth, a measured roux thickens it without becoming gluey, and a light dumpling dough yields soft, airy bites rather than dense biscuits. It’s versatile too — swap in leftover roasted chicken, add more vegetables, or use a biscuit mix for the dumplings when you’re short on time.

Choosing the Right Equipment

Your choice of cookware affects this recipe more than you might think. A 5-7 quart enameled or cast-iron Dutch oven is ideal because it holds heat, creates reliable simmering, and goes from stove to oven if you choose to finish the dumplings under a lid in the oven. If you’re shopping for a new pot, check our guide to the Best Dutch Ovens for Sourdough for options that also perform excellently for soups and braises: Best Dutch Ovens for Sourdough. For a straightforward shopping shortcut on Amazon, consider a classic cast-iron Dutch oven here: https://www.amazon.com/s?k=Dutch+Oven+cast+iron&tag=lesson0f-20.

Other small tools that make the job easier include a sturdy chef’s knife for chopping and a wooden spoon for stirring the roux. If you need a dependable knife, this Amazon search is a good place to start: https://www.amazon.com/s?k=Chef+Knife&tag=lesson0f-20. A reliable set of storage containers will keep your leftovers fresh — see our guide to the Best Stainless Steel Food Storage Containers for recommendations.

Why the Dutch Oven Works

Cast iron and enameled Dutch ovens excel at retaining and distributing heat evenly, which helps extract flavor from the chicken and concentrates the broth without boiling away too quickly. The heavy lid traps steam so the dumplings cook gently atop the simmering liquid; they steam rather than boil, giving a pillowy interior and a tender surface that melds perfectly with the gravy.

The technique is forgiving. Browning the chicken adds complexity but isn’t strictly necessary if you’re short on time. Likewise, the dumpling dough is simple — no need for elaborate folding — and will tolerate variations in moisture and thickness, making this a great weeknight or weekend project.

Tips and Variations

  • For deeper flavor, brown the chicken in batches so the pot remains hot and achieves good color; deglaze the pan with a splash of broth to capture all the browned bits.
  • Add quick-cooking vegetables like peas or chopped spinach in the last 5 minutes of cooking to preserve their color and texture.
  • For a lighter dumpling, add a tablespoon of baking powder and an extra splash of milk; for richer dumplings, use half milk and half sour cream in the dough.
  • Leftovers reheat well: gently warm in a pot on low and add a splash of broth if the gravy has thickened too much (see the Storage section for more).

Below you’ll find the full printable recipe card for ingredients, step-by-step instructions, nutrition estimates, and storage guidance.

If you love one-pot comfort meals, consider pairing your Dutch oven with great bakeware — for those who bake bread and like multipurpose cookware, our guide to Best Loaf Pans for Bread Baking is a useful read for expanding your kitchen setup.
Instructions

1

Season and brown the chicken

Pat the chicken dry and season with 1 teaspoon kosher salt and the black pepper. Heat the Dutch oven over medium-high heat and add the olive oil and 2 tablespoons butter. When the butter foams, brown the chicken skin-side down for 4-5 minutes until golden, then flip and brown the other side 3 minutes. Work in batches if needed so the pot doesn't overcrowd. Transfer browned chicken to a plate.

💡 Pro tip: Browning adds flavor; don’t rush — a good fond (browned bits) is the base for a flavorful gravy.
2

Sauté the aromatics and deglaze

Reduce heat to medium. Add the diced onion, carrots, and celery to the pot and cook 6-8 minutes until softened. Add garlic and cook 30 seconds until fragrant. Sprinkle 1/4 cup flour over the vegetables and stir to coat, cooking 1-2 minutes to remove raw flour taste. Slowly add 1 cup of chicken broth, scraping up browned bits from the bottom to deglaze.

💡 Pro tip: Stir constantly when adding liquid to the roux to avoid lumps.
3

Build the broth and simmer

Return the chicken to the pot along with any juices. Add remaining chicken broth, 1 cup milk, thyme, bay leaf, and remaining 1/2 teaspoon salt. Bring to a gentle simmer, then reduce heat to low, cover, and simmer 25-30 minutes until the chicken is cooked through and tender.

💡 Pro tip: Use bone-in chicken for more body in the broth; if using pre-cooked chicken, add it near the end just to heat through.
4

Shred the chicken and adjust seasoning

Remove chicken to a cutting board, discard skin and bones if desired, and shred the meat with two forks. Taste the broth and adjust salt and pepper. Return shredded chicken to the pot. If the gravy is too thin, increase heat slightly and simmer uncovered to reduce, or mix 1 tablespoon flour with a little cold water and whisk in to thicken.

💡 Pro tip: Shredding off the bone yields the most tender pieces; keep a few larger chunks for texture.
5

Make the dumpling dough

In a medium bowl, whisk together 2 cups flour, 1 tablespoon baking powder, and 1/2 teaspoon salt. Stir in 3 tablespoons melted butter and about 3/4 cup milk until just combined — the dough should be soft but not runny. Avoid overmixing to keep dumplings tender.

💡 Pro tip: If dough seems dry, add a tablespoon more milk; if too sticky, add a little more flour.
6

Cook the dumplings

Bring the pot to a gentle simmer. Drop spoonfuls of dumpling dough (about 2 tablespoons each) onto the simmering liquid, spacing them so they don’t touch. Cover the pot tightly and simmer for 12-15 minutes without lifting the lid. After 12 minutes, peek: dumplings should be puffed and cooked through. Add frozen peas in the last 2 minutes to heat through.

💡 Pro tip: Keep the simmer gentle; a rolling boil will break the dumplings apart.
7

Finish and serve

Remove thyme sprigs and bay leaf. If desired, stir in chopped parsley. Ladle chicken, gravy, and dumplings into bowls and serve hot.

💡 Pro tip: A splash of cream or a pat of butter whisked in at the end brightens the gravy.

More to Cook

You Might Also Like

How to Butcher a Whole Chicken at Home

Learn how to break down a whole chicken into breasts, thighs, drumsticks, wings, and carcass with confident knife work and safe handling. This step-by-step guide includes equipment recommendations, pro tips, and storage advice so you can butcher at home cleanly and efficiently.

View Recipe →

Homemade Cold Brew Coffee Concentrate

Make smooth, low-acid cold brew concentrate at home with a simple steep-and-strain method that yields café-quality iced coffee and lattes. This versatile concentrate stores well, dilutes easily, and is perfect for busy mornings or entertaining.

View Recipe →

Weekly Meal Prep Bowl with Grains and Roasted Vegetables

A versatile, healthy weekly meal prep bowl featuring hearty grains, caramelized roasted vegetables, and a simple lemon-tahini dressing—perfect for busy weeks. Make-ahead friendly and easy to customize, these bowls store well in quality food storage containers for grab-and-go lunches or quick dinners.

View Recipe →

Stay in the loop

Get the Best Kitchen Picks Delivered

New buying guides, honest reviews, and kitchen-tested recipes — straight to your inbox. No spam, ever.