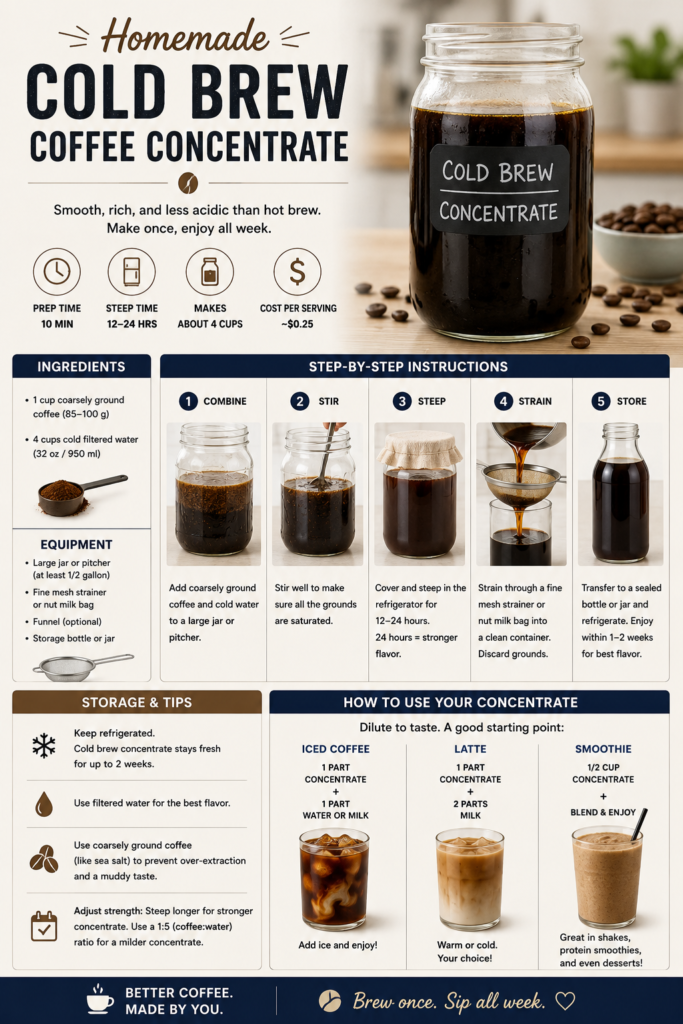
Homemade Cold Brew Coffee Concentrate
Cold brew coffee concentrate has become a pantry staple for coffee lovers who want a smoother, less acidic cup that’s ready to go. Instead of brewing hot water over grounds, cold brewing extracts flavor slowly with cold water over many hours. The result is a concentrated coffee base that’s bold in flavor but mellow on the palate—perfect for iced coffee, creamy lattes, and cocktail mixers.
What makes this recipe special is its simplicity and flexibility. You don’t need expensive equipment: coarse coffee, cold water, and a little patience produce a concentrate you can dilute to taste. Because the brew is concentrated, you can make a larger batch at once, refrigerate it, and have café-style drinks ready in minutes.
Why this method works
Cold brewing extracts coffee solubles at a much slower rate than hot brewing. The lower temperature reduces the extraction of bitter compounds and acids, producing a naturally sweeter, fuller-bodied brew. Making a concentrate—using more coffee to water—gives you a versatile base that stays fresh in the fridge for days and lets you control the strength of each drink by diluting with water, milk, or sparkling water.
This approach also reduces waste. A single batch of concentrate makes multiple servings of iced coffee and several espresso-style lattes when mixed with steamed milk, so you spend less time brewing each cup and more time enjoying it.
Choosing the right equipment
Although you can cold-brew in anything nonreactive, certain tools make the process easier and cleaner. Recommended options include a large glass jar or pitcher for steeping and a fine-mesh sieve or cheesecloth for straining. A French press works extremely well as a combined steep-and-strain vessel—just press and pour when the brew is ready.
If you prefer a neat, single-serve setup, a dedicated cold brew maker or a large French press is ideal. For storage, quality airtight containers keep your concentrate fresh longer—check out our guide to the Best Coffee Storage Containers for recommended options.
Here are a few products that pair well with this recipe (affiliate links):
- French Press — a simple all-in-one steeping and straining tool that makes cold brew effortless.
- Large Glass Mason Jar — inexpensive, food-safe, and perfect for batch steeping and refrigeration.
- Espresso Machine — not necessary for making the concentrate, but great for steaming milk and making café-style drinks using cold brew.
Using your coffee maker or espresso machine
While the cold brew process itself is hands-off, your coffee maker or espresso machine can still play a role. Use the carafe or a thermal pitcher from your coffee maker to store or serve drinks, and use the espresso machine to steam milk for lattes or cappuccinos made with cold brew concentrate. If you use your machine often, keep it well-maintained—descaling regularly prolongs its life and ensures clean water for brewing. For descaling options and recommendations, see our guide to the Best Descalers for Coffee Machines.
Cleaning and maintenance
After straining your concentrate, rinse and clean your steeping vessel and filters promptly. Coffee oils can cling to containers and impart stale flavors if left to sit. If you use reusable filters or components in an espresso machine to froth milk alongside your cold brew creations, follow manufacturer cleaning guidelines and descale regularly for the best performance.
Tips and variations
- Adjust the strength by changing the coffee-to-water ratio: make a stronger concentrate for milk-forward drinks, or a lighter concentrate for iced black coffee.
- Try different bean origins and roast levels—single-origin medium roasts produce bright, clean flavors, while darker roasts yield chocolatey, fuller-bodied concentrates.
- Add flavor during brewing: a split vanilla bean, a cinnamon stick, or a pinch of salt in the steeping jar subtly enhances the finished concentrate.
- For the smoothest texture, do a two-stage strain: first through a sieve, then through a fine mesh or cheesecloth to remove fine fines and sediment.
Serving ideas
Use 1 part concentrate to 1-2 parts water or milk depending on desired strength. For an iced latte, combine concentrate with steamed or frothed milk and pour over ice. For a refreshing afternoon pick-me-up, dilute with cold water and serve with a twist of citrus or a splash of simple syrup. Concentrate also makes a tasty base for coffee cocktails—use it in an espresso martini-style drink or mix with tonic and a citrus garnish for a sparkling coffee spritz.
Why store it correctly
Cold brew concentrate keeps best when sealed in an airtight container and refrigerated. High-quality storage minimizes oxidation and preserves aroma; again, our Best Coffee Storage Containers guide is a great resource if you plan to keep concentrate on hand for several days.
With minimal active time and maximum payoff, this homemade cold brew concentrate is a convenient, delicious way to elevate your daily coffee ritual. Make a batch on Sunday and enjoy café-style drinks all week.