Vacuum Sealed Sous Vide Chicken Breast
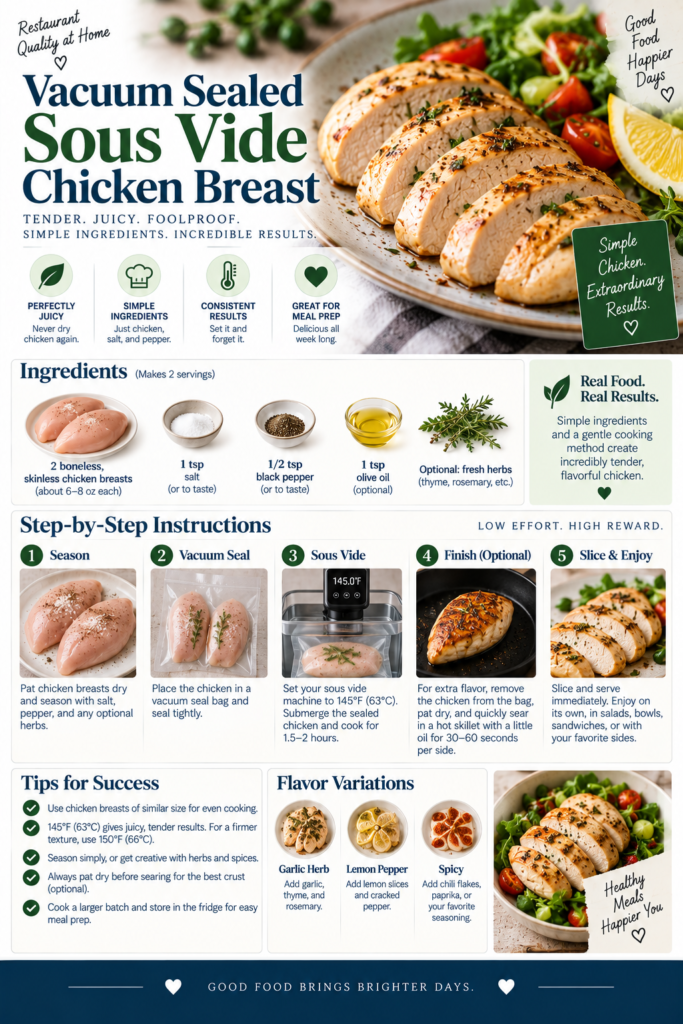
Sous vide chicken breast is the go-to technique when you want consistent, restaurant-quality results with minimal babysitting. By cooking chicken low and slow in a temperature-controlled water bath, you eliminate the risk of overcooking and get a uniform, tender texture edge-to-edge. Vacuum sealing the chicken before cooking locks in seasonings and juices, improves flavor infusion, and makes the finished product ideal for meal prep.
What makes this recipe special is the combination of vacuum sealing and precise temperature control: the vacuum seal forces aromatics up against the meat for better penetration, while sous vide ensures the exact doneness you want every time. Finish with a quick sear for color and texture, and you have a versatile protein that stores and reheats beautifully — especially when packed into the right food storage containers for weekly meals.
Why vacuum seal before sous vide?
Vacuum sealing removes the air around the chicken so water can transfer heat efficiently and aromas can concentrate at the meat surface. Sealing also reduces the chance of water entering the bag and allows you to cook more compactly in the water bath. If you don’t have a vacuum sealer, a high-quality zip-top bag with the water displacement method will work in a pinch.
Choosing the right equipment
Three tools make this recipe straightforward: an immersion circulator (sous vide device), a vacuum sealer (or heavy-duty resealable bags), and a set of airtight food storage containers to hold cooked portions. If you plan to use sous vide regularly or to batch-cook proteins for the week, investing in quality containers and a reliable vacuum sealer is worth it.
Recommended purchases:
- Anova-style immersion circulator (or equivalent) — precise temperature control is the heart of sous vide.
- A dedicated vacuum sealer for reliable, durable vacuum bags and ease of use.
- Meal prep containers — airtight, stackable containers make storing and transporting sous vide chicken simple.
If you want recommendations on containers tailored for weekly prep and portioning, see our in-depth guide to Best Meal Prep Containers for Weekly Cooking. Planning to vacuum seal frequently? Check our Best Vacuum Sealers for Food Storage guide to compare models and features.
Safety and preparation notes
Sous vide requires attention to accurate temperature and time for food safety. This recipe uses temperatures and durations that are safe for pasteurizing chicken when followed correctly. Always use fresh, high-quality chicken, and keep surfaces and utensils clean when handling raw poultry. If using pre-portioned breasts of different sizes, try to select pieces of similar thickness for even results.
Serving ideas
Vacuum sealed sous vide chicken is extremely versatile: slice it onto salads, tuck into sandwiches, chop for grain bowls, or serve whole with a pan sauce. It pairs well with roasted vegetables, quinoa or rice, and a simple lemon-herb dressing. Because the texture is moist and tender, a quick high-heat sear is all you need to add color and a savory crust.
Tips and variations
1. Brine or season: For extra assurance of juicy meat, you can brine the chicken briefly in a light salt solution (about 1 tablespoon salt per cup of water) for 30–60 minutes before sealing. Pat dry before vacuum sealing.
2. Herb and citrus infusion: Place a sprig of thyme, a smashed garlic clove, and a thin slice of lemon in the bag with each breast for bright, aromatic notes. Vacuum sealing intensifies these flavors.
3. Sear for texture: After sous vide, pat the chicken dry and sear in a hot skillet with a little oil for 30–45 seconds per side to develop a golden crust. Alternatively, use a torch for a quick finish.
4. Meal prep friendly: Portion cooked breasts into airtight meal prep containers while still slightly warm to avoid condensation. Label with the date and use within the recommended storage window.
Why food storage containers matter
Good food storage containers keep sous vide chicken tasting fresh and make reheating efficient. Look for containers that are airtight, BPA-free, microwave-safe, and stackable to save space. If you batch cook for the week, choosing the right container size lets you portion meals with consistent calories and macros — ideal when planning lunches or freezer stash.
For tips on choosing containers that match your meal prep routine and cookware, check our buying guides: Best Meal Prep Containers for Weekly Cooking and Best Cookware for Meal Prep. These guides help you match container sets with batch-cooking needs and large-capacity cookware so you can cook smarter, not harder.
Finishing thoughts
Vacuum sealed sous vide chicken breast takes a little equipment and planning, but rewards you with a dependable, tender protein ideal for quick weeknight dinners or organized meal prep. Once you try the combination of vacuum sealing and sous vide precision, you’ll likely reach for it whenever you want foolproof chicken.
Ready to get started? Grab your vacuum sealer, a sous vide circulator, and a set of meal prep containers, and you’ll be making restaurant-quality chicken at home in no time.