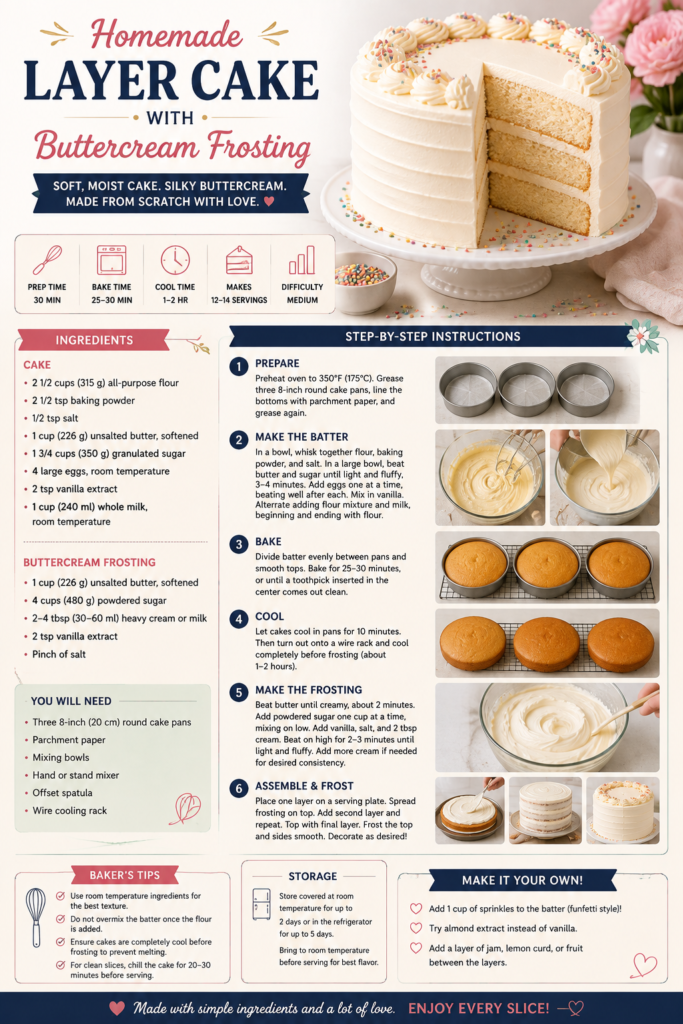
Homemade Layer Cake with Buttercream Frosting

A classic homemade layer cake with silky buttercream frosting—moist, tender layers and a smooth, spreadable frosting perfect for birthdays or weekend baking. This recipe uses simple pantry ingredients and a stand mixer to streamline the process.

30 min Prep Time
30 min Cook Time
60 min Total Time
12 Servings
Medium Difficulty

Ingredients

Servings:
12
Nutrition (per serving)
Calories 520 kcal
Protein 4g
Fat 28g
Carbohydrates 65g
Fiber 1.5g
💾 Storage

Store the frosted cake at room temperature for up to 2 days in a covered cake box or dome; store longer (up to 5 days) in the refrigerator. Let refrigerated cake sit at room temperature for 30–60 minutes before serving for best texture. You can freeze unfrosted layers, wrapped tightly in plastic and foil, for up to 3 months; thaw in the refrigerator overnight and bring to room temperature before frosting.

🍳

Best Made With: Stand Mixer

Choose a stand mixer with at least 325 watts and a 4.5–5 quart bowl for most home cake-baking needs.

See Our Top Stand Mixer Picks →

Homemade Layer Cake with Buttercream Frosting

This classic layer cake is one of those recipes that delivers big on flavor with relatively little fuss. Tender, buttery cake layers are balanced by a rich, silky buttercream that spreads smoothly and holds up well for decorating. Whether you’re celebrating a special occasion or simply craving a homemade treat, this cake is reliably delicious.

What makes this recipe work is the combination of a few simple techniques: properly creaming butter and sugar for aeration, using sour cream (or yogurt) for extra moisture and tenderness, and tempering the buttercream with a touch of milk if it gets too stiff. The result is a cake with fine crumb and frosting that’s easy to pipe or spread for a polished finish.

Choosing the Right Equipment

Good tools make this recipe easier and more consistent. A stand mixer speeds up the process and gives a better, more stable cream than mixing by hand—especially for the buttercream. If you don’t have a stand mixer, a sturdy hand mixer will work; however, a stand mixer will save time and effort for repeated bakes or larger batches. Compare features, bowl sizes, and power when choosing—this guide on KitchenAid vs Cuisinart Stand Mixers is useful if you’re deciding between popular models.

For the pans, choose straight-sided, even-heating cake pans (8-inch or 9-inch depending on your preference). A reliable set of pans ensures even layers and predictable baking times. If you’re assembling and frosting a lot, an offset spatula and turntable make smoothing buttercream much easier.

If you’re new to baking and assembling layer cakes, consider starting with the basics: an oven that holds accurate temperature, one reliable set of pans, and a medium-sized stand mixer. HomeCookPicks’ Best Baking Sets for Beginners is a helpful reference for sourcing starter tools that will elevate your home baking.

What You’ll Learn From This Recipe

This recipe walks you through making a classic vanilla butter cake and a creamy American buttercream. You’ll learn how to prepare pans for even baking, how to check doneness without overbaking, and how to assemble and crumb-coat your layers so the final frosting looks clean and professional. The techniques are intentionally approachable, so they work whether you’re a confident home baker or just getting comfortable with multi-layer cakes.

Tips and Variations

  • Make sure your butter, eggs, and dairy are at room temperature before you begin; this helps create a smooth batter and well-emulsified buttercream.
  • If your buttercream seems too stiff, add milk or heavy cream one teaspoon at a time until it reaches spreadable consistency; if it’s too soft, chill briefly and re-whip.
  • To get perfectly even layers, weigh your batter and divide it equally between pans, or use a simple measuring cup to distribute batter by volume.
  • Flavor variations: swap 1 tsp of vanilla for 1 tsp almond extract, fold in 1/2 cup cocoa powder to make chocolate cake, or add a layer of jam or curd between the cake layers for extra brightness.

Below you’ll find the full ingredient list and step-by-step instructions to make this layer cake from start to finish. Follow the timeline and tips to keep the process smooth: preheat early, cool your layers completely before stacking, and take your time with the crumb coat for the cleanest finish.

Happy baking! If you enjoyed this recipe and want to expand your baking toolkit, check the buying guides linked above for recommended mixers and beginner baking sets to make your next cake even easier.
Instructions

1

Prep and Preheat

Preheat your oven to 350°F (175°C). Grease and flour two 8-inch round cake pans (or line bottoms with parchment). Bring butter, eggs, milk, and sour cream to room temperature for best mixing results.

💡 Pro tip: Use an oven thermometer if you suspect your oven runs hot or cold; even small temperature differences affect rise and crumb.
2

Mix Dry Ingredients

Whisk together the all-purpose flour, baking powder, and salt in a medium bowl until evenly combined. Set aside.

3

Cream Butter and Sugar

In the bowl of a stand mixer fitted with the paddle attachment, cream the softened butter and granulated sugar on medium-high speed until light and fluffy, about 3-4 minutes. Scrape down the bowl as needed.

💡 Pro tip: Proper creaming traps air and contributes to a lighter crumb—don't rush this step.
4

Add Eggs and Flavor

Add the eggs one at a time, mixing well after each addition. Scrape the bowl, then mix in the vanilla extract. The mixture may look slightly curdled—this is normal.

5

Combine Dry and Wet Ingredients

With the mixer on low, alternate adding the dry ingredients and the milk/sour cream, beginning and ending with the dry ingredients (dry-wet-dry). Mix just until combined—do not overmix to preserve tenderness.

💡 Pro tip: Divide the dry ingredients into three additions and the milk into two additions for easier blending.
6

Bake the Layers

Divide the batter evenly between the prepared pans. Smooth the tops and bake in preheated oven for 25-30 minutes, or until a toothpick inserted into the center comes out clean or with a few moist crumbs. Rotate pans halfway through baking if your oven has hot spots.

💡 Pro tip: If using 9-inch pans instead of 8-inch, baking time will be slightly shorter; start checking at 20 minutes.
7

Cool Completely

Allow the cakes to cool in the pans for 10-15 minutes, then invert onto wire racks to cool completely. Do not frost warm cakes, or the buttercream will melt.

💡 Pro tip: If the tops domed while baking, level them with a serrated knife or cake leveler once cool to create stable stacking surfaces.
8

Make the Buttercream and Assemble

For the buttercream, beat the softened butter on medium speed until smooth. Gradually add 3 cups of confectioners' sugar, then add vanilla and 2 tablespoons of milk. Increase speed and beat until fluffy, adding more sugar or milk to reach desired consistency. Place one cake layer on a serving plate or turntable, spread a generous layer of buttercream, top with the second layer, apply a thin crumb coat, chill 15-20 minutes, then finish with a final layer of frosting and smooth or pipe as desired.

💡 Pro tip: Chill briefly between crumb coat and final coat—cold crumb coat reduces crumbs in the final finish.

More to Cook

You Might Also Like

Creamy Blender Tomato Soup

Restaurant-quality creamy tomato soup made entirely in a blender. San Marzano tomatoes, caramelized tomato paste, and a cream finish produce a silky-smooth result in under 40 minutes.

View Recipe →

Green Smoothie with Spinach and Banana

A simple, nutrient-packed green smoothie combining fresh spinach, ripe banana, Greek yogurt and almond milk for a creamy, energizing breakfast or snack. Quick to blend, easy to customize, and perfect for busy mornings.

View Recipe →

Stay in the loop

Get the Best Kitchen Picks Delivered

New buying guides, honest reviews, and kitchen-tested recipes — straight to your inbox. No spam, ever.