How to Butcher a Whole Chicken at Home

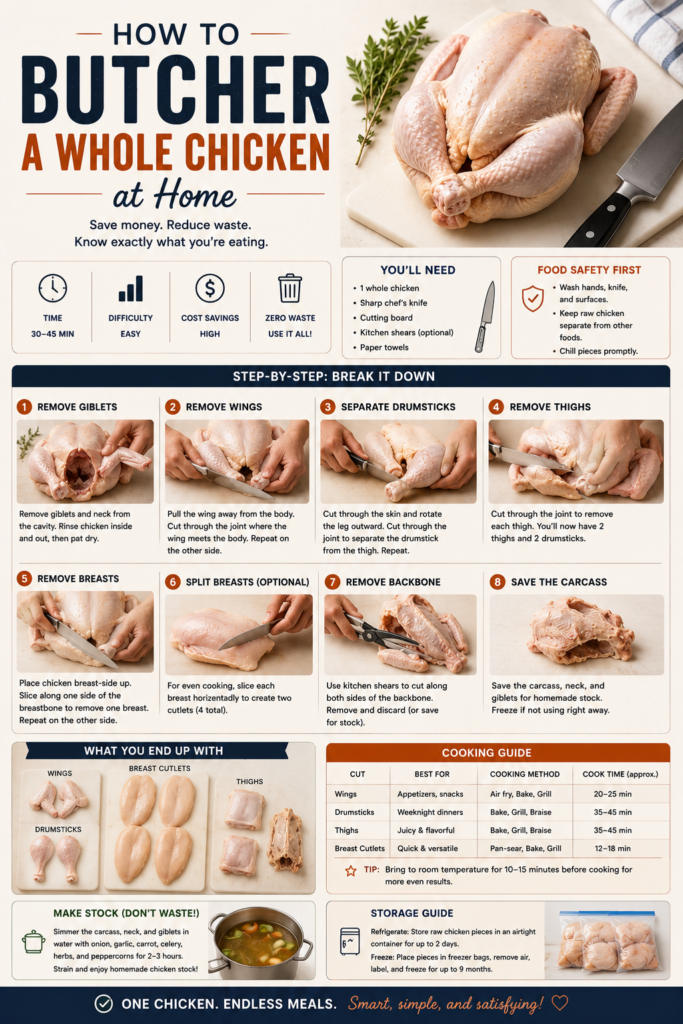
Learn how to break down a whole chicken into breasts, thighs, drumsticks, wings, and carcass with confident knife work and safe handling. This step-by-step guide includes equipment recommendations, pro tips, and storage advice so you can butcher at home cleanly and efficiently.

20 min Prep Time
4 Servings
Medium Difficulty

Ingredients

Servings:
4
Nutrition (per serving)
Calories 200 kcal
Protein 26g
Fat 10g
Carbohydrates 0g
Fiber 0g
💾 Storage

Store raw cut chicken pieces in a covered container in the coldest part of the refrigerator and use within 1–2 days. For longer storage, freeze pieces in airtight freezer bags or vacuum-sealed packs for up to 9 months. Cooked chicken keeps in the refrigerator for 3–4 days or can be frozen for 2–3 months. Always cool cooked chicken before refrigerating and reheat to an internal temperature of 165°F (74°C) when serving.

🍳

Best Made With: Chef's Knife

Choose a chef's knife with a comfortable handle, a full tang, and a blade length you can control easily (8 inches is a versatile standard).

See Our Top Chef's Knife Picks →

How to Butcher a Whole Chicken at Home

Butchering a whole chicken at home is one of the most useful kitchen skills you can master. It saves money, reduces waste, and gives you pieces sized exactly how you want them for roasting, braising, or frying. Once you get comfortable with the anatomy and a few basic cuts, you can break a whole bird down in 15–25 minutes.

This guide emphasizes safe technique, the right tools, and simple steps to produce breasts, boneless or bone-in thighs, drumsticks, wings, and a carcass perfect for stock. The method works whether your bird is just-thawed or refrigerator-cold; the same principles apply to most whole poultry, and learning this skill unlocks more control over portions and cooking methods.

Why this method works

We focus on using the joints as natural separation points rather than hacking through bone, which gives cleaner pieces with less effort. A sharp chef’s knife and a steady cutting board let you cut through skin and muscle cleanly; then you use the heel of the blade and gentle pressure to find and open joints. Removing the backbone and splitting the breast are efficient ways to portion the bird for everyday cooking and for saving the carcass for stock.

Choosing the right equipment

Good tools make this process faster and safer. At minimum you’ll want a full-size cutting board with a non-slip surface and a sharp chef’s knife. A boning knife or paring knife is helpful for trimming and removing the wishbone, and kitchen shears are handy for spine removal if you prefer them.

  • Chef’s knife — the workhorse for most of the cuts. You can shop for a reliable chef’s knife here: Chef’s knives on Amazon.
  • Boning knife (optional) — helps separate meat from bone cleanly: Boning knives on Amazon.
  • Large, sturdy cutting board (plastic or wood) — wide enough to hold the whole bird. Example: Wood cutting boards on Amazon.
  • Kitchen shears, paper towels, and a shallow tray to catch juices.

If you’re curious about specialized knives for slicing or carving after you break down the bird, check out our guide to Best Slicing and Carving Knives, and if you ever prefer larger bone-cleaving tools, this page on Best Meat Cleavers for Home Use is useful.

Safety and prep

Work on a clean, stable surface. Use paper towels to pat the chicken dry; a drier surface is safer and easier to cut. Keep raw chicken juices contained — work over a tray and have a dedicated area of your sink for rinsing any tools after use. Sanitize your board and knife thoroughly after butchering. Wear a non-slip mat under your board if needed, and always cut away from your body.

What you’ll learn in this tutorial

Follow the step-by-step instructions (listed separately for quick reference) to remove the backbone, split the breast, separate legs from thighs, and trim wings. The carcass left behind is perfect for making a rich homemade chicken stock.

Tips and variations

Here are a few practical tips to make the process smoother:

  • Work with a very sharp knife. A dull blade slips and increases the risk of cutting yourself. If your chef’s knife needs sharpening, take a moment with a whetstone or a professional service.
  • If you’re nervous about bones, use kitchen shears to cut the backbone out first; this gives you more control and reduces force required with a knife.
  • Save the giblets and neck for stock. The carcass and leftover trimmings make an excellent base for soups and gravies.
  • To get boneless breasts, make a shallow cut along one side of the breastbone and run the blade close to the ribcage while peeling the meat away; a boning knife can make this cleaner.

How to use the pieces

Once you have breasts, thighs, drumsticks, wings, and the carcass, you can cook them in many ways: roast breasts whole, braise thighs, deep-fry wings, or simmer the carcass for stock. Breaking down a chicken at home also gives you the chance to portion meat for meal prep and control salt and marinades from the beginning.

Butchering at home is a foundational skill that pays off quickly. With practice you’ll improve speed and confidence—and you’ll be saving money while elevating the flavor and flexibility of your home cooking.

If you want guidance on selecting knives that match your style (vegetable work vs. meat-focused cutting), our buying guides are a great resource: Best Nakiri Knives for Vegetables and the earlier-mentioned Best Slicing and Carving Knives.

Ready to get hands-on? Follow the step-by-step instructions to break down your whole bird. The full ingredient and step list is available with the instructions below for easy reference while you work.
Instructions

1

Prepare your workspace

Clear and sanitize your work area. Place a large non-slip cutting board on a tray to catch juices. Pat the chicken dry with paper towels and remove any packaging or giblets from the cavity (save the giblets and neck for stock if desired).

💡 Pro tip: A dry bird is easier and safer to cut; keep paper towels handy to blot away juices as you work.
2

Remove the wings (optional first step)

Place the chicken breast-side down. Pull each wing away from the body and use your chef's knife or kitchen shears to cut through the joint where the wing meets the breast/shoulder. Work slowly to locate the joint rather than forcing through bone.

💡 Pro tip: Bending the wing back exposes the joint and helps you find the correct cutting point.
3

Remove the backbone (spatchcock/backbone cut)

With the chicken breast-side down, run your knife or shears down one side of the backbone from tail to neck, then the other side to fully remove the backbone. Set the backbone aside for stock. You can stop here if you plan to spatchcock (flatten) the bird for grilling or roasting.

💡 Pro tip: If you prefer not to use shears, use the heel of your chef's knife and controlled downward pressure to cut through the ribs at the backbone.
4

Split the breast

Flip the bird breast-side up and press firmly down the center of the breastbone to flatten slightly. Using the knife, cut down the center along the breastbone to separate into two breasts. For bone-in halves, leave the ribs attached; for boneless, run your blade along the ribcage to separate meat from bone.

💡 Pro tip: If a boning knife is available, use it to trim meat away from the keel bone and ribs for cleaner boneless breasts.
5

Separate legs from thighs and drumsticks

Turn the bird so the leg assembly faces you. Pull the leg away from the body and locate the joint between thigh and body. Cut through the skin and muscle until the joint pops open, then cut cleanly through the joint to separate the legquarter. To separate thigh from drumstick, find the knee joint and cut through it.

💡 Pro tip: Work with the leg bent to expose the joint; don’t try to saw through bone.
6

Trim and portion wings and thighs

If you want wingettes and drumettes, cut through the wing joint to separate the three segments. Trim excess skin or fat from thighs as needed. Use the tip of your knife to remove the wishbone from the breast if you prefer boneless or boned breasts with cleaner presentation.

💡 Pro tip: Keep usable skin and small trimmings for rendering or adding to stock; they add flavor and fat.
7

Check your cuts and clean up

Inspect all pieces for stray bone fragments or cartilage and trim as needed. Rinse (if you choose) and pat pieces dry. Move raw pieces into labeled containers or trays for immediate cooking or refrigeration/freezing. Thoroughly wash and sanitize knives, cutting board, and surfaces that contacted raw chicken.

💡 Pro tip: A quick wipe with a bleach solution or a commercial kitchen sanitizer will ensure surfaces are safe for future use.
8

Use the carcass for stock

Place the backbone and any trimmings into a pot with cold water, aromatics (onion, carrot, celery), and a pinch of salt. Simmer gently for 2–4 hours to extract flavor and collagen for a rich homemade chicken stock.

💡 Pro tip: Roasting the carcass briefly before simmering deepens the stock's flavor.

More to Cook

You Might Also Like

Vacuum Sealed Marinated Steaks

Make restaurant-quality steaks at home by vacuum sealing them with a bold marinade for deep flavor and fast, even marinating. This method uses airtight food storage solutions so steaks are tender, juicy, and perfect for grilling or pan-searing.

View Recipe →

Meal Prep Chicken and Rice for the Week

Make weekday lunches easy with this simple, flavorful Meal Prep Chicken and Rice recipe—built for batch cooking and packed into ready-to-go containers. Learn equipment tips, storage advice, and variations to keep your meals fresh and delicious all week.

View Recipe →

Green Smoothie with Spinach and Banana

A simple, nutrient-packed green smoothie combining fresh spinach, ripe banana, Greek yogurt and almond milk for a creamy, energizing breakfast or snack. Quick to blend, easy to customize, and perfect for busy mornings.

View Recipe →

Stay in the loop

Get the Best Kitchen Picks Delivered

New buying guides, honest reviews, and kitchen-tested recipes — straight to your inbox. No spam, ever.