Homemade Peanut Butter (Blender-Friendly, Smooth or Chunky)
There’s something irresistibly satisfying about spreading truly fresh, homemade peanut butter on toast, folding it into baked goods, or stirring it into sauces. Making peanut butter at home is fast, economical, and gives you total control over texture and flavor — whether you prefer ultra-smooth or pleasantly chunky. The key is a high-powered blender and a few simple technique tweaks that let you transform roasted nuts into silky butter without overheating the motor or ending up gritty.
This recipe is special because it was designed with the home blender in mind: short processing stages, deliberate pulse intervals, and optional additions that won’t overwhelm the appliance. You’ll learn how to coax oil from the nuts for a creamy emulsion, how to add salt or sweetener to taste, and how to avoid common pitfalls like overheating or overprocessing. If you like to tinker with texture, the method below makes it easy to stop when the butter is just right.
Why this method works
Turning nuts into butter is mostly about releasing natural oils and breaking down solids into tiny particles so they suspend evenly in the fat. Using a blender that creates strong turbulence and a vortex keeps the nuts moving toward the blades, accelerating the breakdown without requiring long, continuous runs. Short pulses and occasional scraping let you judge texture as you go and prevent excess heat buildup. Adding a small amount of neutral oil optionally helps achieve a smoother texture faster and reduces strain on the motor, especially in smaller personal blenders.
Choosing the right equipment
Not every kitchen appliance is equally suited for nut butter. Blenders with tall narrow jars can be excellent if they generate a strong vortex; high-torque, variable-speed machines are best for control. If you’re deciding between brands or models, our buying guide on Best Blenders for Smoothies covers power, jar shape, and motor ratings that are very relevant to making nut butter. For a brand comparison, see our take on Vitamix vs Ninja to weigh durability and blending style.
If you want ready-to-shop links, consider a high-powered countertop blender or a reliable personal model for smaller batches. Popular options include full-size professional machines as well as more compact blenders for quick single-jar batches. You can also pick up glass storage jars so your fresh nut butter keeps its flavor longer: Vitamix blenders on Amazon, Ninja blenders on Amazon, and glass storage jars on Amazon are convenient places to start.
Overview of the process
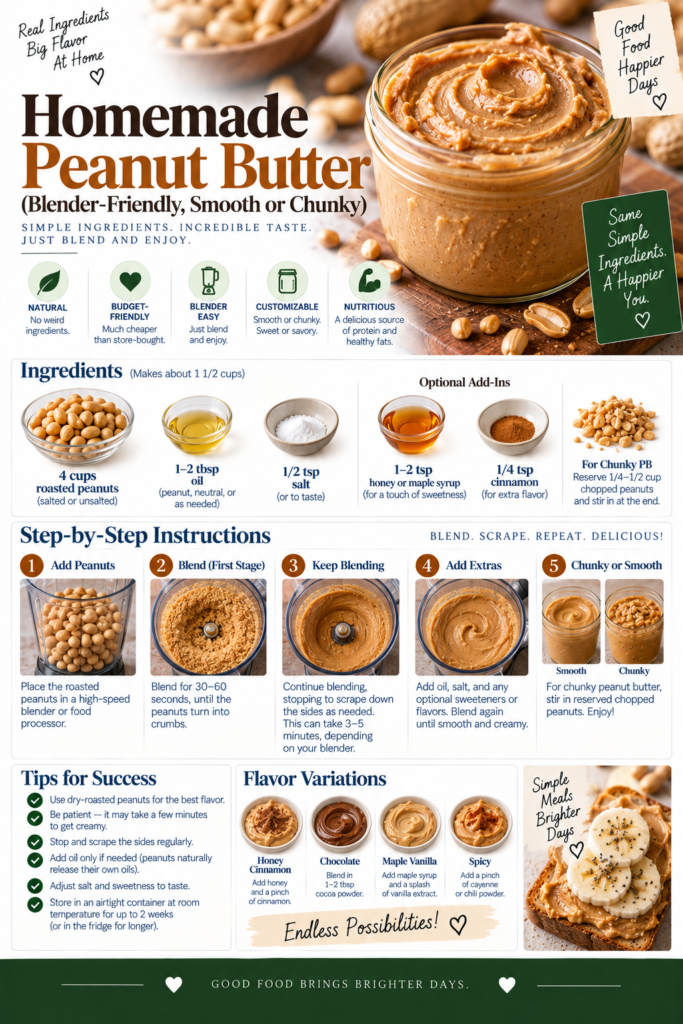
The full recipe details are in the recipe card below, but the basic flow is simple: process in short bursts, pause to scrape and evaluate, add a small amount of oil only if needed, and continue until the desired smoothness is reached. If you prefer a chunky style, reserve a portion of the nuts to stir in at the end. Temperature control is helpful: if the blender jar gets warm, pause a few minutes so the motor can rest and the nut butter can cool slightly.
What to expect for flavor and texture
Freshly made nut butter tastes livelier than store-bought: the aroma is more pronounced and the natural sweetness comes through. If you like a savory spread, a pinch of salt will brighten the flavor; for a sweeter version, a touch of honey or maple syrup does the trick. You can also experiment with roasting levels before processing — light roast yields a delicate, nuanced flavor, while a darker roast gives a deeper, toasted profile.
Cleaning and maintenance
Because nut butter is oily, bowls and jars will retain residue. Clean your blender jar immediately after making butter: add warm water and a few drops of dish soap, run the blender briefly, then rinse. For stubborn residue, let the jar soak in warm soapy water before scrubbing. Use a silicone spatula to scrape the sides and a bottle brush for narrow jars. Proper cleaning keeps seals and blades functioning well and prevents flavor transfer between batches.
Uses and serving suggestions
Homemade nut butter is wonderfully versatile: spread it on toast, incorporate it into smoothies, whisk into dressings or satays, or swirl into oatmeal. Because the flavor is fresh and robust, it pairs especially well with tart fruits, dark chocolate, and whole-grain breads. If you want to serve it as a dip, thin it with a splash of oil or warm water for a creamier consistency.
Tips and variations
Here are a few simple tips and variations to help you customize your batch:
- Use roasted (not raw) nuts for best flavor; if you only have raw, roast them briefly in a hot oven until aromatic.
- Pulse in intervals and scrape the jar between bursts to keep texture even and avoid overheating the motor.
- Add salt, sweetener, or a neutral oil sparingly — you can always add more, but you can’t take it away.
- For chunky style, reserve a portion of the nuts, pulse the bulk until smooth, then fold in the reserved pieces in the final pulses.
Further reading
If you’re shopping for a new blender specifically for spreads and smoothies, our Best Blenders for Smoothies guide outlines models with the right power and jar design. If you’re choosing between popular brands, the Vitamix vs Ninja comparison can help you pick a machine that matches your blending habits.
Enjoy the process — once you get comfortable making nut butter at home, you’ll find it’s a quick, rewarding way to elevate breakfasts, snacks, and sauces with a flavor that store jars just can’t match.